In Brightspace you can easily associate marks, annotations, and overall feedback with student assignment submissions, assisting the feedback process. You can also provide structured feedback tailored to individual students, using the Rubrics tool.
In this web article, we explain how to:
As well as this article, please follow the guidance of your faculty, school, or area when marking assignments.
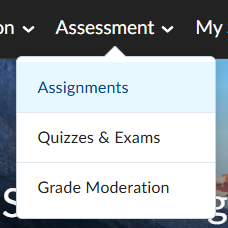
Access the Assignments tool by clicking on the Assessment expanding menu in the navigation bar and click on Assignments.
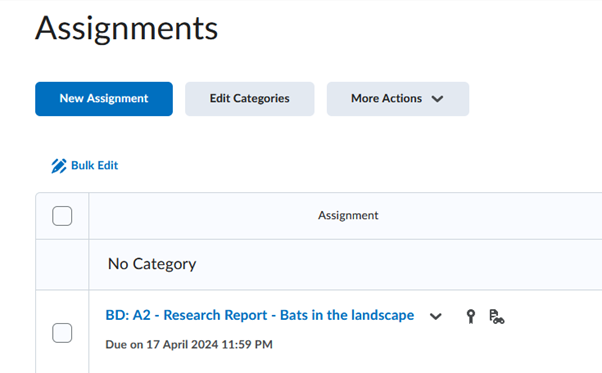
 On the Assignments main screen click the assessment you wish to view.
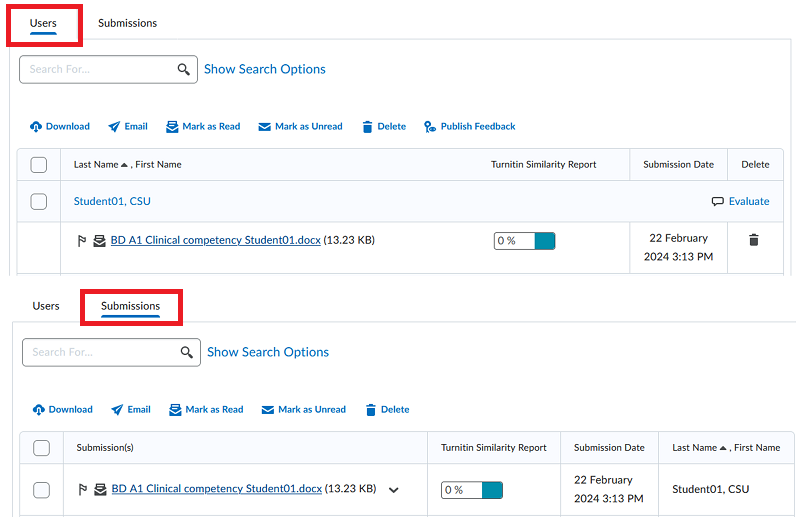
 You can access the submissions either by selecting the name of the student to view their submission, or by accessing the Submissions tab which will list all submissions that have been made for the assignment.
 Clicking on the document name of the submission will open the file in the evaluation screen, if it is an allowable file type. Depending on the settings chosen for the assignment, allowable files may include Microsoft Office documents, PDF files, plain and rich text files, open document formats, and images.

For more information on allowable files, see Create assignments under Choose submission options.

Clicking on Go to Evaluate will take you to the assignment evaluation screen. To review the document, click on the student submission.
If the student has only made one submission, the file will open automatically.

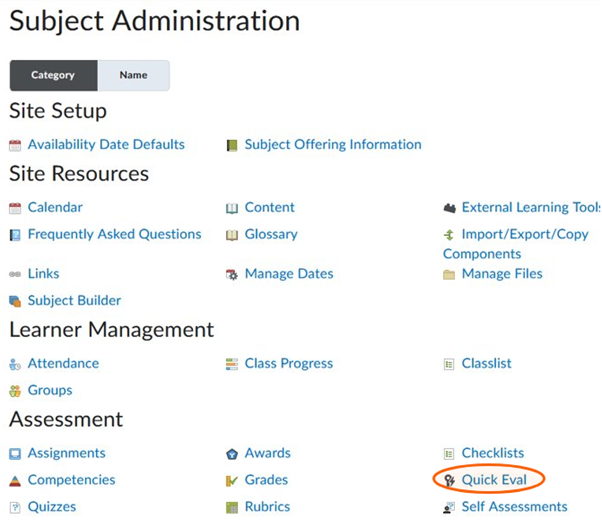
Quick Eval allows you to view all learner submissions, including assignments, quizzes, and discussions. Quick Eval enables access and marking of submissions from a single location. To access Quick Eval click on Subject Admin in the subject navigation bar and click on Quick Eval.
When you select a student submission it will open in the assignment evaluation screen. From here you can mark the student submission, provide feedback in multiple formats, and annotate, print, or download the student submission.
In Brightspace you can view Turnitin similarity reports from the submissions page. Navigate to the assignment you want to assess. If you have enabled Turnitin for your assignment, you will see a similarity score for each submission for which a Turnitin similarity report has been returned.
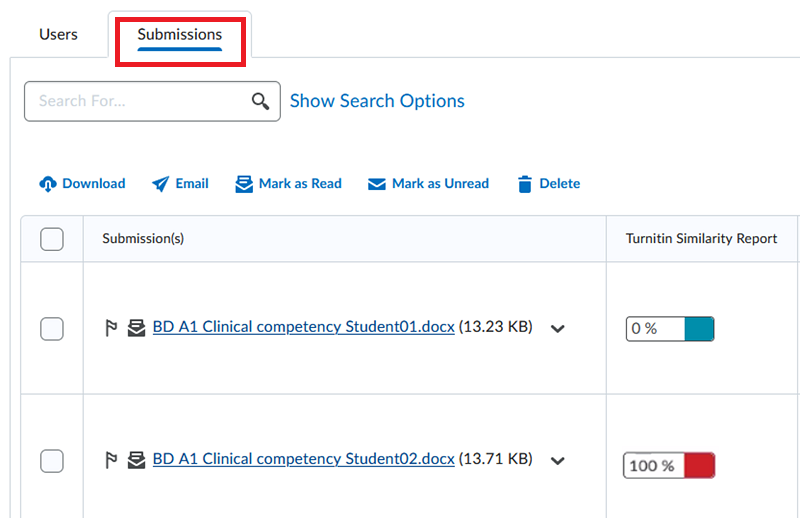
To view the similarity report for a submission, click the similarity score for that submission. The similarity report will open directly in Turnitin.

To find out more about interpreting similarity reports, or how to design assessment to minimise plagiarism and collusion, please contact an Educational Designer by logging a Service Request with the Division of Learning and Teaching.
Clicking on the icons on the right-hand side will open various panels. These include:
Flags for Review: Turnitin’s algorithms look deeply at a document for any inconsistencies that would set it apart from a normal submission. If something different is noticed, it is flagged for review and will display here.
Match Overview: This displays what percentage of the submission matches sources in the Turnitin database.
All Sources: All the sources that have been found are displayed and sorted by highest percentage matched. Clicking on any source displays a short section of text from that source, highlighting which words match the submissions.
Filter and Settings: In this panel you can filter to exclude certain items such as quotes and bibliographies from the overall percentage and change colours settings
Excluded Sources: Displays sources that were excluded from the similarity report.
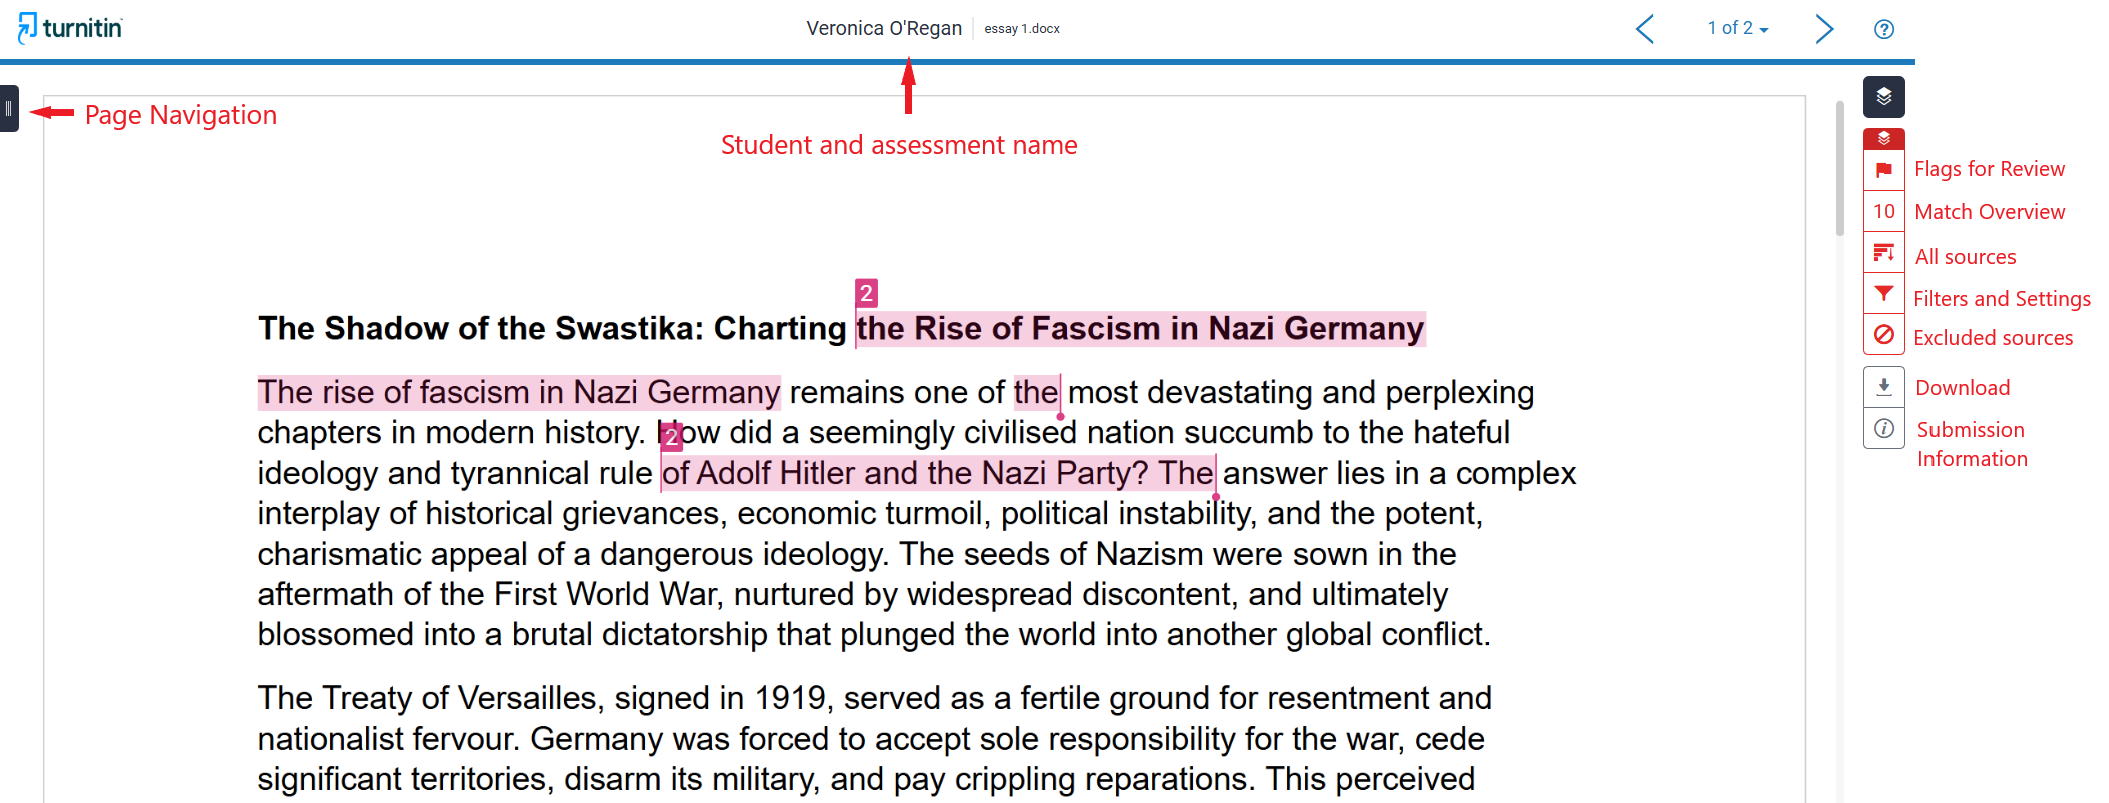
The evaluation screen presents details about the assignment and the student submission. To access the evaluation screen:
You can see all files the student has submitted for the assessment if they have submitted multiple files via the drop-down box next to the student’s name.
![]() In the top right hand corner of the page, you can navigate between users to display and evaluate their assignments.
In the top right hand corner of the page, you can navigate between users to display and evaluate their assignments.
![]()
In a site with multiple markers, you need to be aware that you will see all users in the site and should verify that the submission you are marking has been assigned to you by checking the student's name and ID.
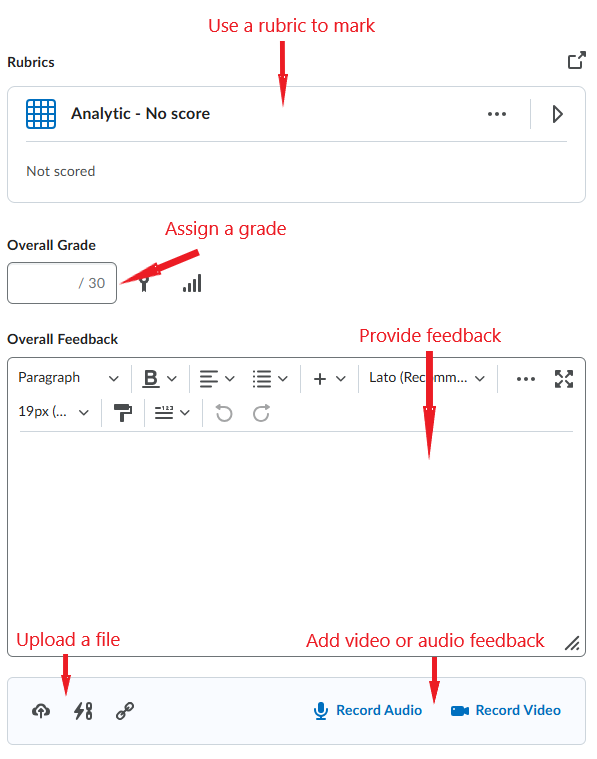
On the right-hand side you will see the feedback panel which will allow you to mark using a rubric, assign a mark, add overall feedback, upload feedback files, and add video or audio feedback. You can resize the panel by clicking and dragging the right hand border.
On the left-hand screen, you will see the document reader for compatible files which you can use to annotate the student’s submission with textual or graphical tools. Other files, such as video or audio submissions, will be available to download.
The document viewer is a powerful tool which is designed to aid you in navigating and evaluating student submissions.
Navigation is facilitated using thumbnails, which allow you to see page thumbnails, document outlines, and bookmarks. Page number allows you to click through or enter a page number to move through the submission. Page layout allows you to adjust the page mode (single or double), transition (continuous or paged), and the rotation of the page. Search options allow you to search within a document for key terms.
The viewer also facilitates on screen reading via the Zoom and fit page options which enable you to zoom in, zoom out or to fit page to screen. You can resize the thumbnail display or the document screen inline using the handlebars on the draggable dividers and the viewer and marking areas will dynamically resize so you can focus more on the task you are working on. You can also make the document viewer full screen.
The viewer has several annotation tools. See Annotate student submissions below.

Brightspace provides markers with the ability to annotate student assessment submissions with specific and targeted guidance focusing on specific parts of the assignment.
Individualised feedback is also possible in the rubric tool as an alternative to inline annotations.
Textual annotation tools enable markers to provide explanations, suggestions, and corrections directly within the text of the student's work. This can help students understand precisely what aspects of their work require attention and how to improve.
Textual feedback can be added using the notes and text box tools which are located on the annotation toolbar.
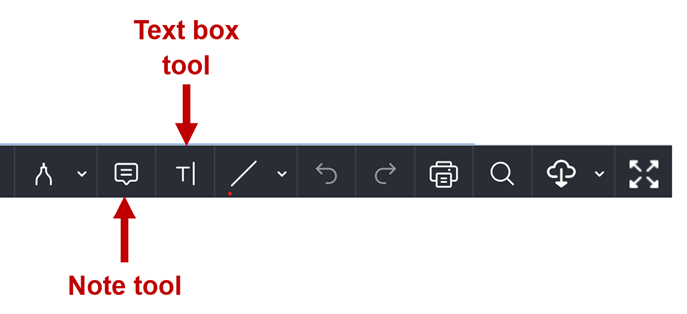 Adding a Text box: To add a text box, click on the text box tool and then on the place in the submission that you want it to appear. You can customise the text and background colour, transparency, font, and size, as well as do some basic formatting. The text appears directly on the screen.

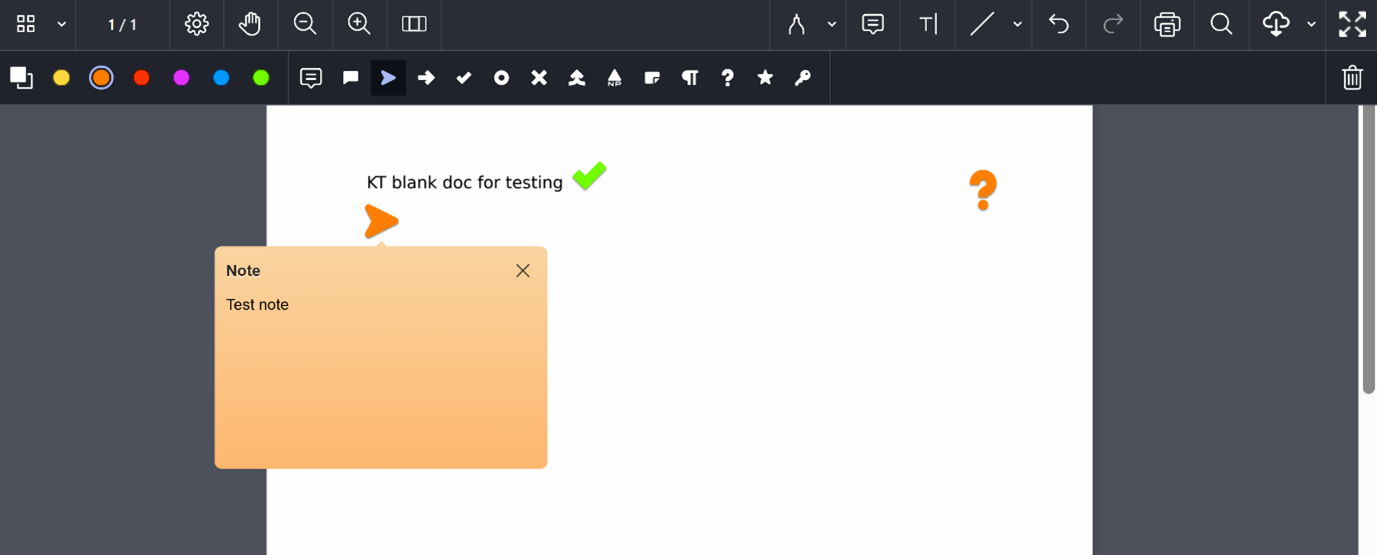
Adding a Note: The major difference between notes and text boxes is the way they appear on screen. Notes appear as icons on screen which then expand to show comments. Notes can be configured to different shapes and colours to support a systematic approach to annotation. You may choose to use a green tick, for example, to highlight correct work, or an orange question icon to indicate that more information may be required.
In the following image one of the three notes icons has been selected and shows that longer comments are able to be provided. When not selected the submission text is not obscured as is the case with text boxes.
To add a note, click on the note tool and then click on the part of the page you want it to appear. You can then choose to change the shape and/or colour of the note and the icon that will appear on the submission. Click into the note to begin typing your comment.
Graphical annotation tools allow markers to draw, sketch, or markup directly on documents or images, offering a more visual approach to feedback. There are three main ways to do this in Brightspace.
Quick text mark-up: You can highlight areas of revision or key points, strikethrough unnecessary or incorrect information, or underline text in the submission by dragging over the text in the submission, right clicking your mouse, and then selecting the appropriate action.
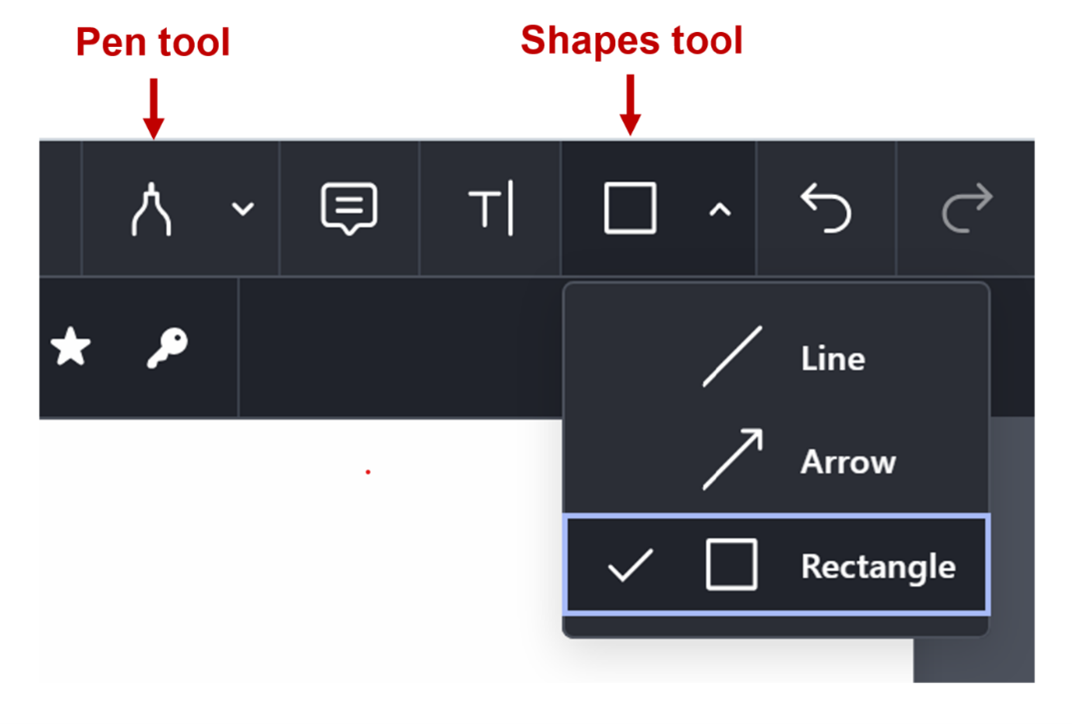
 Pen tool: Allows you to draw freehand directly onto the document using either a freehand drawing, freehand highlighting, or text highlighting option. For example, you might circle or highlight key points or sketch diagrams to illustrate concepts.
Shapes Tool: Allows you to draw lines, arrows, and rectangles to frame content or use arrows to indicate connections.
To use these tools click on the tool and select the option you wish to use. Then click on the submission and draw on the screen.
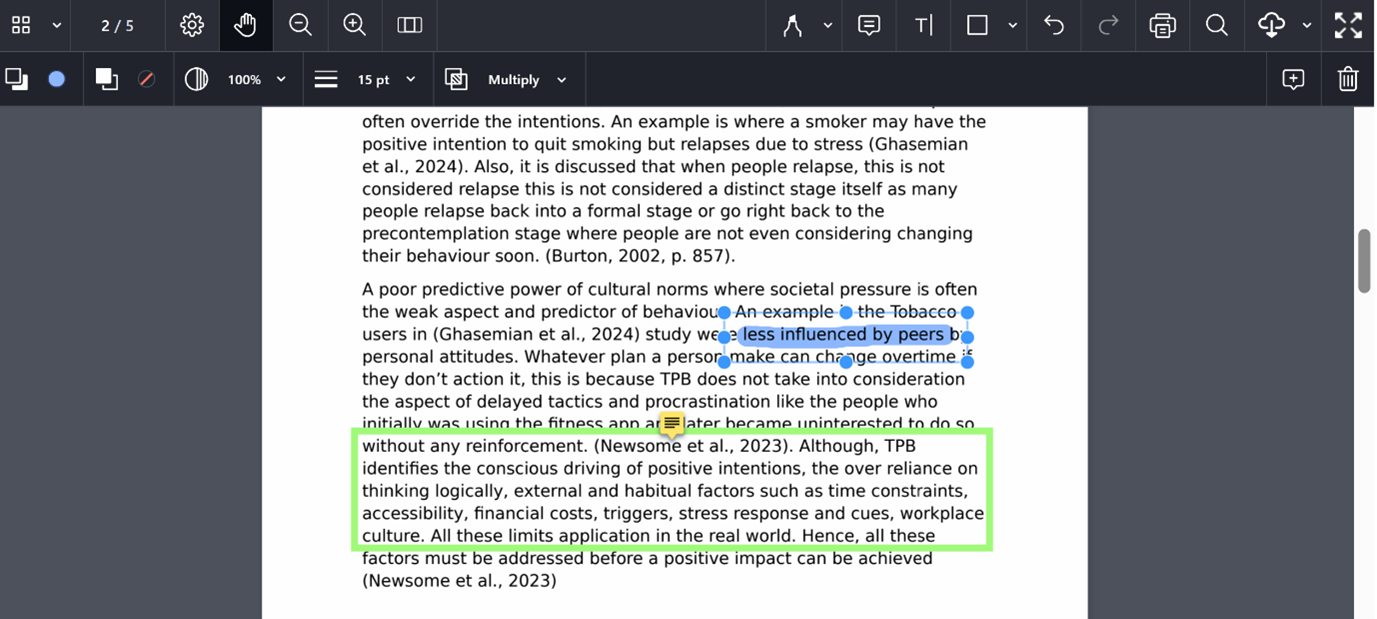
You have the option to change the colour, weight, and other visual elements on the options screen. You can also attach a note to your graphical annotation by clicking on the note icon on the right-hand side of the options menu.
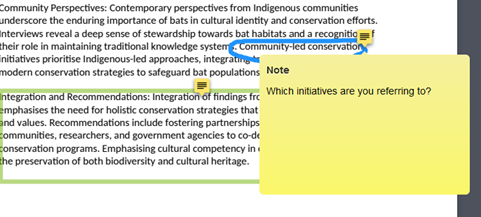
As in the Notes tool, the comments you provide will reside in an icon until selected for viewing.
Annotations can be deleted by clicking on the annotation. A secondary menu bar will appear where you can alter the properties of the annotation or delete the annotation entirely.

After adding your annotations remember to Save Draft. For guidance on publishing, see Publish marked assignments below.

Using the Rubric tool in marking allows you to assign levels to each of the criteria associated with the assignment. You also have the option to provide feedback linked to the criteria, in written, audio, and video formats.
Any rubric attached to the assignment will be visible on the right-hand side of the assignment evaluation screen.

There are two options for using the Rubric tool in marking: inline, or via a pop-out window. If you are marking with two screens, you may wish to utilise the pop-out window option to view the submission and rubric simultaneously.
To use the Rubric tool in-line click the Play icon.

The Rubric tool will open in-line. If you have multiple criteria in the rubric, these will be visible.
To assign a particular level for a criterion, click the appropriate part of the slider. As you hover over each of the levels, any criterion level descriptor associated with the level will be displayed.
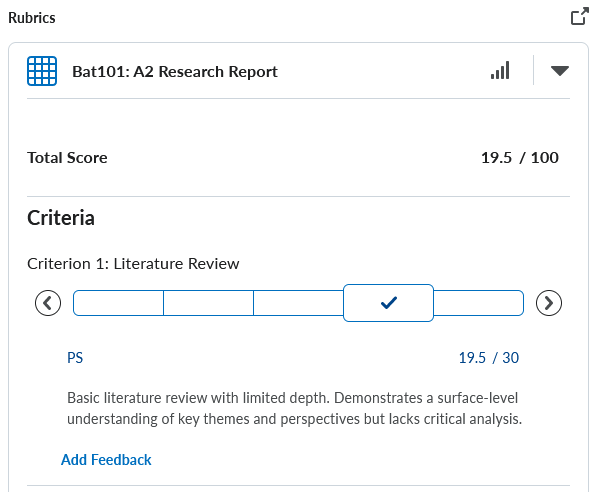
Clicking a level will automatically assign a mark for that criterion. To change this manually, click on the mark and change it using the up and down arrows or by using the keyboard.
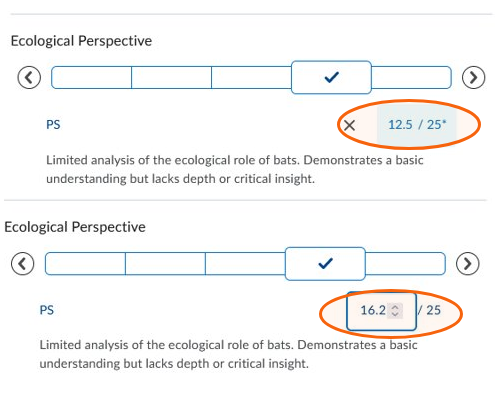
When using Brightspace rubrics, it is recommended that you do not allocate marks that exceed the highest number in the defined range for each grade. CSU's criterion-based assessment policy assigns specific mark ranges for High Distinction, Distinction, Credit, Pass, and Fail. Assigning marks above these limits contradicts university policy and can lead to issues with grade calculation and transfer.
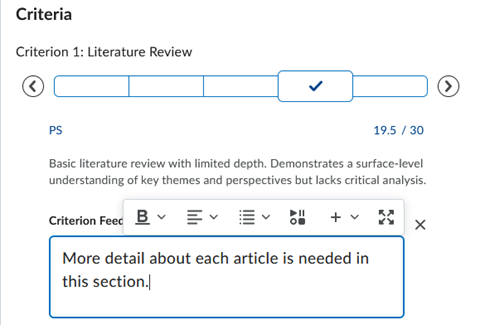
If pre-populated feedback has been associated with the criterion level, this will appear. You can provide more personalised feedback by clicking the Add Feedback button. You can add text, images, equations, code, media, or links.
To use the Rubric tool via a pop-out window click the Pop-out icon.

The criterion or criteria in the rubric will open in a separate window. To assign a particular criterion level, click the desired level. You also have the option to add feedback by clicking on the Add Feedback button . You can also add images, equations, code, media, or links.
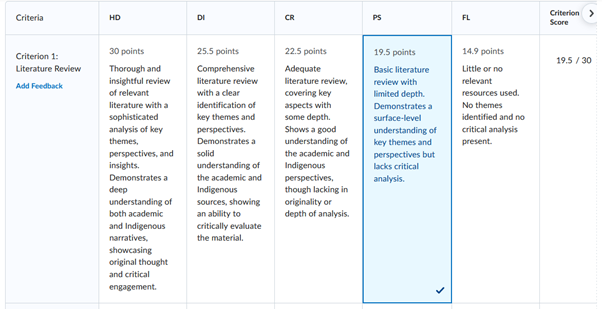
The automatically assigned criterion mark can be adjusted using the arrows, or entered manually using the keyboard.

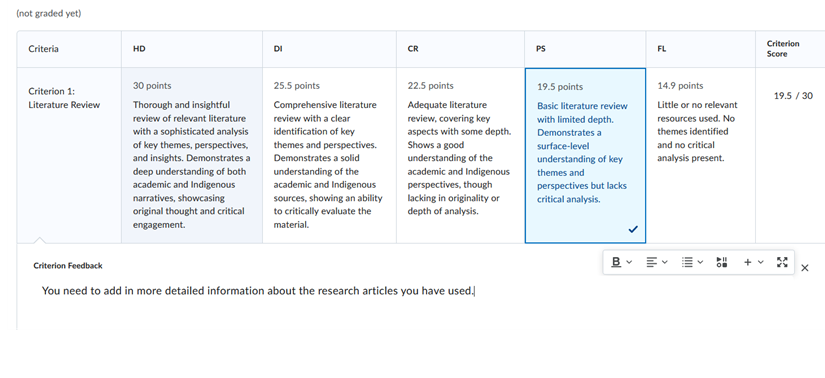 After using the Rubric tool, remember to Save Draft. For guidance on publishing, see Publish marked assignments below.

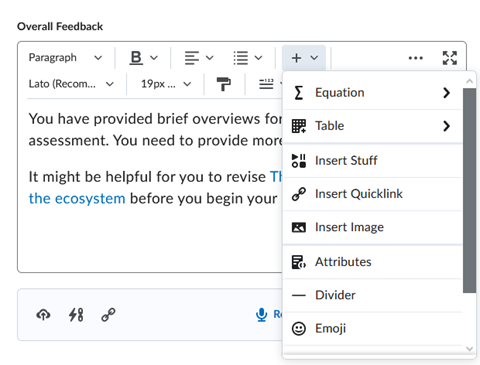
The Overall Feedback section of the assignment evaluation screen is a simple but powerful tool to help student learning. You can provide written feedback in this tool, including tables, images, and equations. You can also provide links to YouTube and other websites. There is also a Quick Link facility which will allow you to link to sections of your subject site that may be beneficial for students to re-visit. These tools are accessed via the + icon.
Wherever possible, we recommend that you mark online within Brightspace, as the most secure and efficient method.
When online marking is not possible, you can mark offline. Offline marking is possible submission by submission, or in bulk.
A single assessment submission can be downloaded using the download option on the assessment submission screen, or from the submissions page by selecting one item for download.

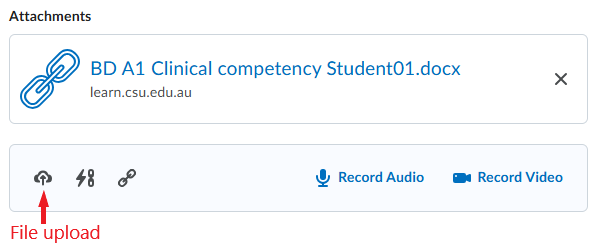
You can now provide feedback on the submission by annotating the file and upload the annotated file using the file upload feature on the assignment evaluation screen.
Click Save Draft.
Please read Publish Marked Assignments below before publishing marks and feedback.

To bulk download assignment submissions, in the Users or Submissions tab in the Assignments tool, select the users or submissions you would like to download. You can select all submissions by clicking the check box at the top of the submission box and click Download.
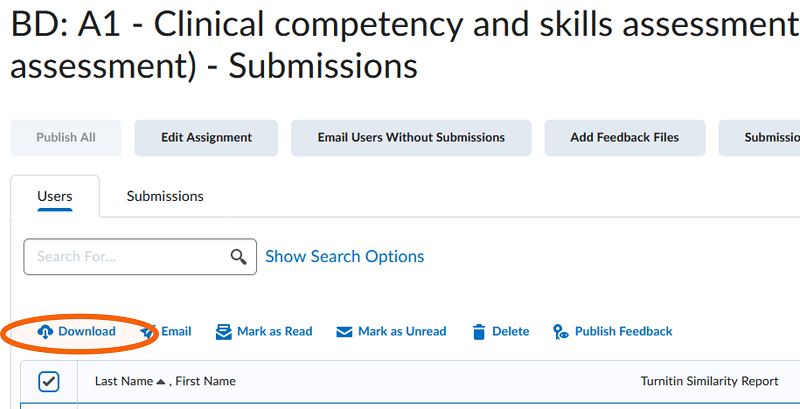
A dialog box will appear, and the files will be downloaded as a .zip file. Open the zip file to access and annotate the downloaded files.
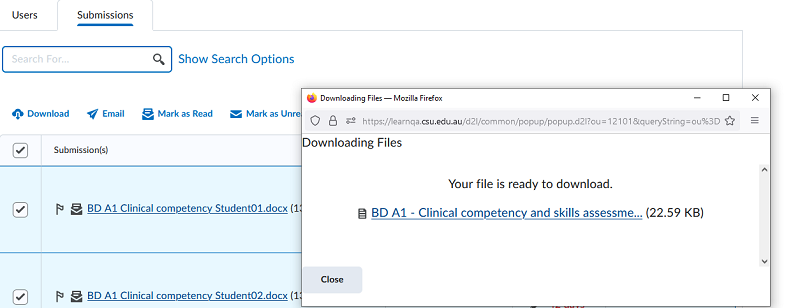
Do not rename the downloaded file name after you enter feedback and save changes.
Once you have added feedback to all submission files and saved them, highlight all the updated folders, right click on them, and create a .zip folder.
You can now upload the submissions by navigating to the assignment screen and clicking on Add feedback.
When you publish submissions, students can see their marks and feedback unless you hide the grade item and assessment task. For more information, please see Finalise assignments and Set up My Grades.
Brightspace allows subject conveners to control who can mark and publish an assignment. Convenors can choose to allow markers to publish their own evaluated submissions, all submission, or none.
Markers may not have access to publish evaluated submissions, and where they have been granted access, it is recommended that they discuss with the subject convener any protocols in place.
For more information, see Add Markers and Publishers on Finalise Assignments.
Marked student submissions can be published individually or in bulk. To maintain consistency and quality, and to allow for any marking moderation to occur, we would recommend that marked assignments should be published in bulk after all submissions have been marked.
Published marks and feedback will be transferred to My Grades and will normally be visible to students.
To publish a single student evaluation, enter the assignment evaluation screen, and click the Publish button.

When all submissions have been marked, access the assignment submission screen. Click on the Publish All option.
The Publish All option will be greyed out if no submissions have been marked.

A confirmation screen will appear and provide information about what will be published. Students with no submission or no saved evaluations will not have their marks or feedback published. To proceed to publication, click on Publish.
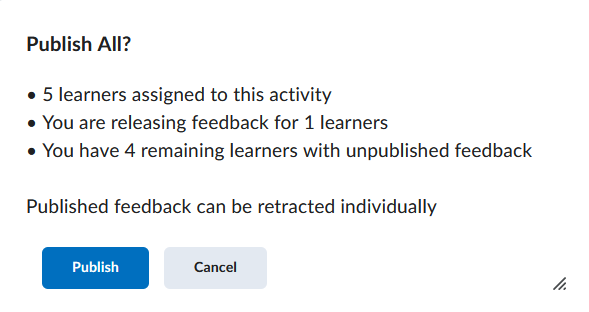
After the marked submissions have been published, the status of student submissions will change to Published.

Updating or retracting published marks and feedback should be done with caution. It is essential to communicate clearly with students about any changes made and to ensure that the grading process remains fair and consistent.
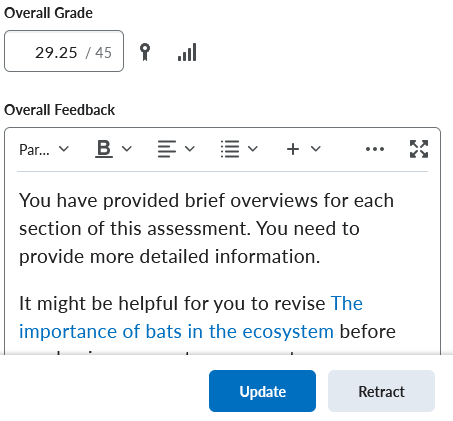
Access the marked student submission you wish to retract. If you wish to edit the mark, annotations, or feedback, make the desired changes in the assignment evaluation screen and click Update.
If you wish to retract the published mark and feedback, click Retract. This returns the status of the mark, annotations and feedback to draft.
Brightspace and Charles Sturt use different methods to calculate late penalties for assignments.
At CSU, penalties are assessed based on full calendar days elapsed since the due date. For instance, an assignment submitted 8 hours late would be considered 1 day late.
Brightspace, on the other hand, calculates lateness in hours and minutes. An assignment submitted 8 hours late will be displayed as 8 hours late in Brightspace. Once 24 hours have passed, it will show as 1 day late.
To illustrate this difference:
To align Brightspace's late penalty calculations with CSU's policy, it's generally necessary to add 1 to the number of days Brightspace indicates. We recommend communicating with your students about this discrepancy to make them aware of how their late penalty will be calculated.
This page may be updated at any time. If you print it, you could miss future changes. Please check this page regularly for the latest updates.