When grades have been finalised in Brightspace, they need to be transferred to the Student Management System (Banner). To do this, you need to use the Grade Finalisation Tool.
The Grade Finalisation process:

It is important that staff do not make changes to the Brightspace Gradebook (My Grades) after grades have been transferred. This will ensure that Brightspace remains an accurate record of student achievement.
The Grade Finalisation Tool transfers grades from the Brightspace Gradebook (My Grades) on demand. Therefore, the first step is to review My Grades in Brightspace. A thorough review at this stage may reduce any grade transfer errors.
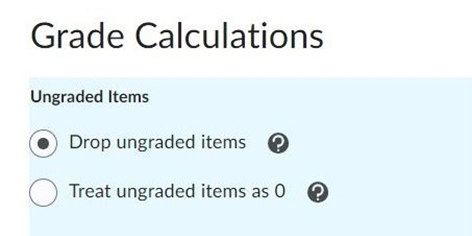
A zero mark should be allocated in two cases: when a student has made no submission, and when a submission is judged to merit a mark of zero. In the latter case, a submission icon will display next to the zero mark in the cell in My Grades, indicating that an assignment, quiz attempt, or assessed discussion post is present in Brightspace.
This is the default setting.
The Grade Finalisation Tool will import and load any grade populated from any of these 3 final grade fields in the Gradebook – Final Calculated Grade, Final Adjusted Grade, and Administrative Override.
The system prioritises the display of grades in the following order:
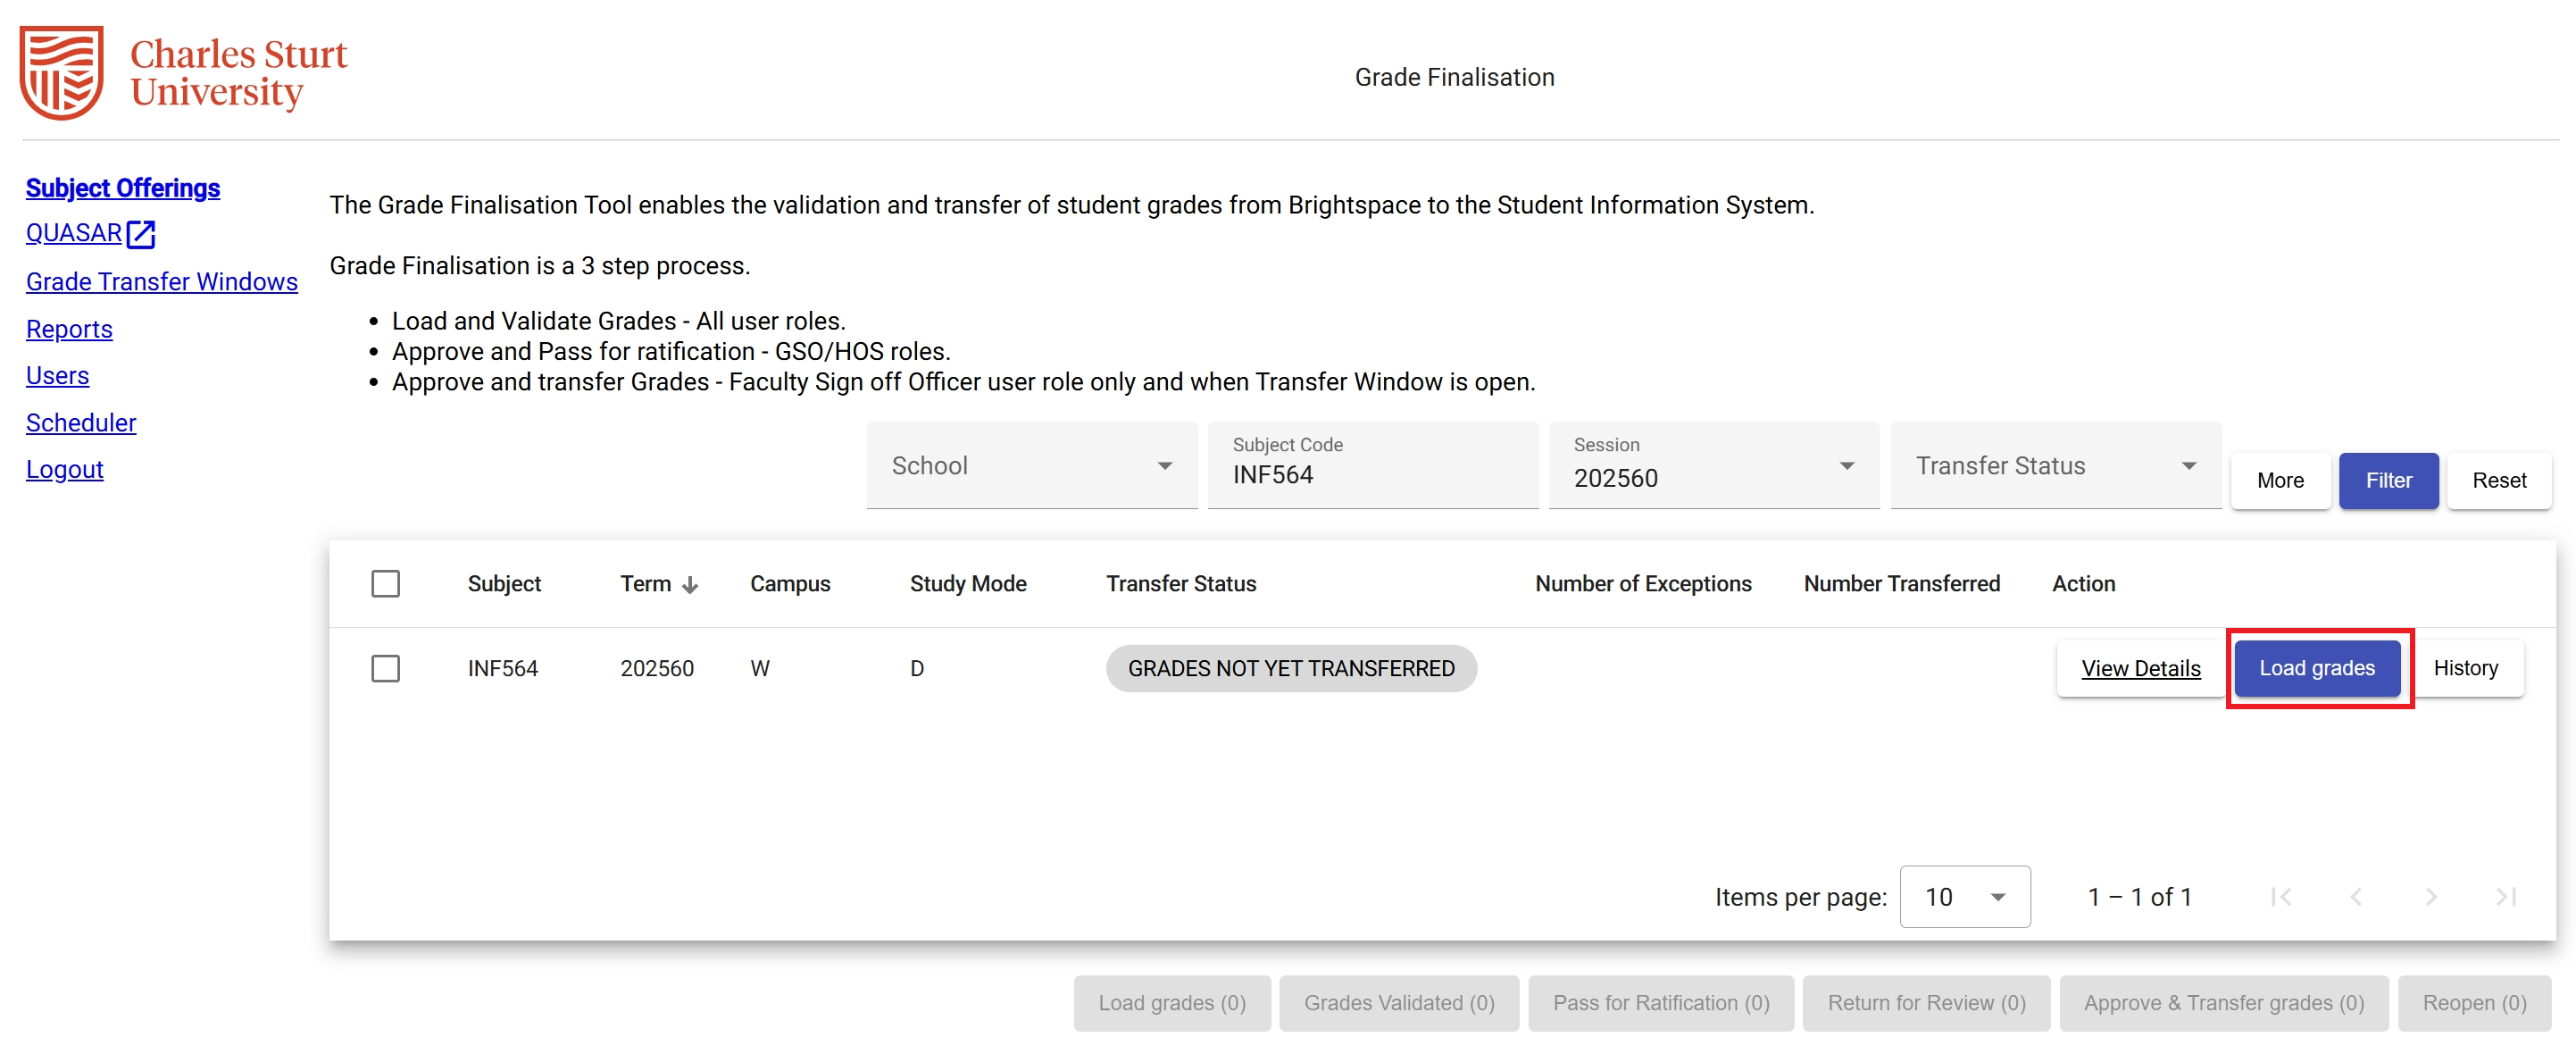
Check Status and Validation messages. If you encounter a validation error when loading grades, click View Details to see the validation message. For more detail on the validation messages, please see the section on Grade Loading Errors below.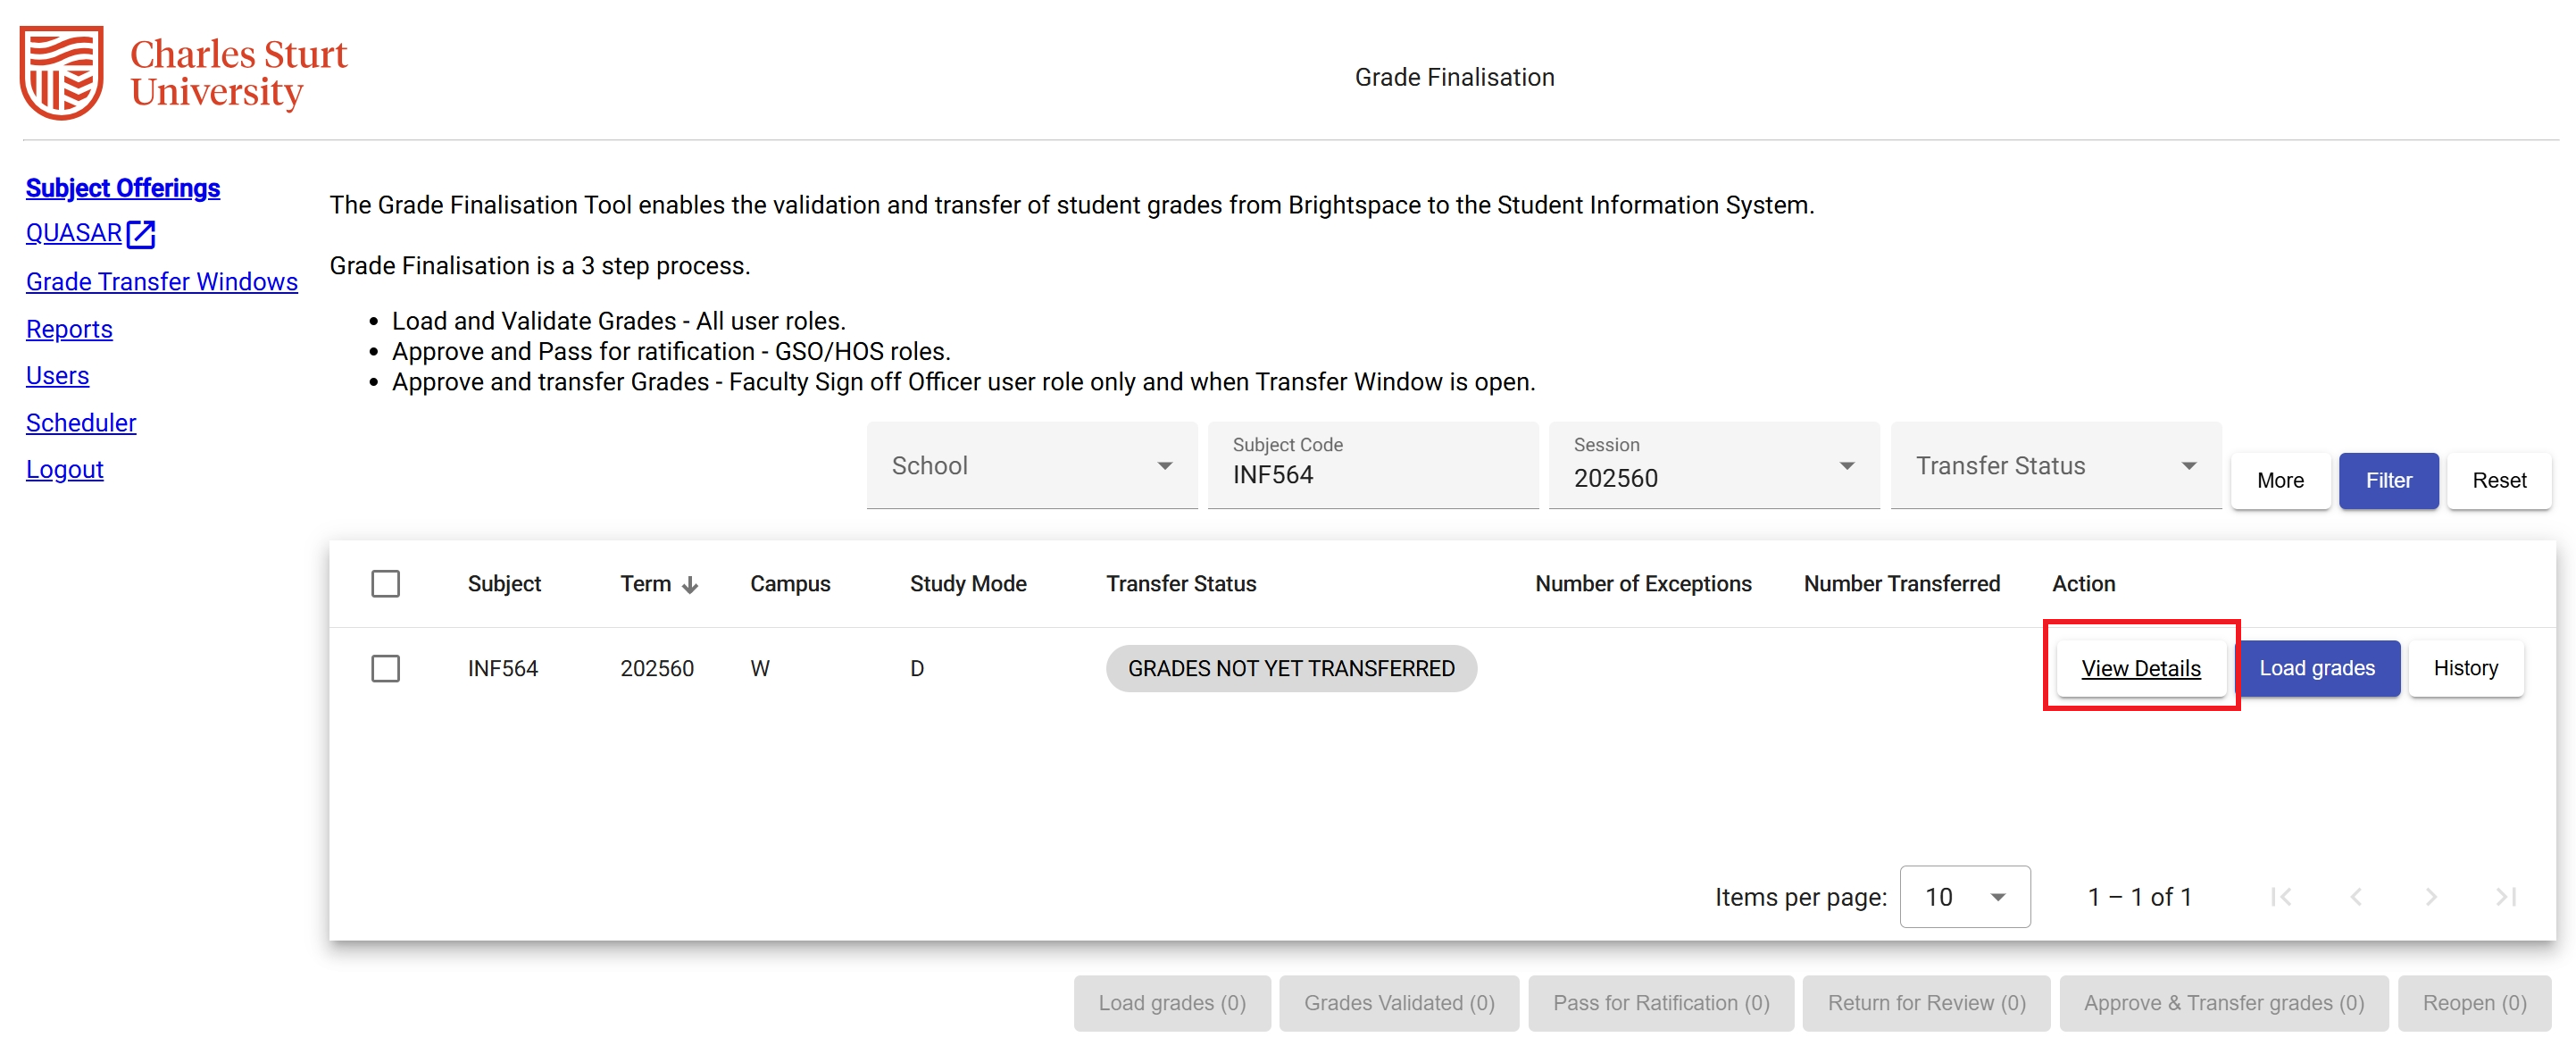
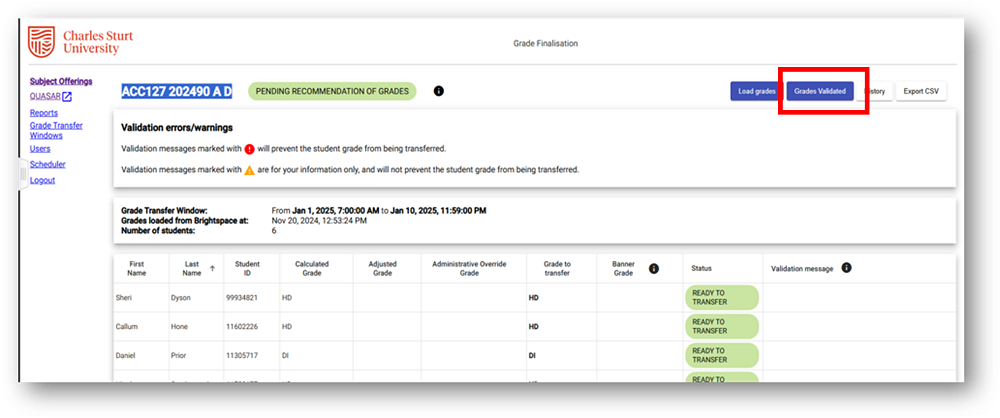
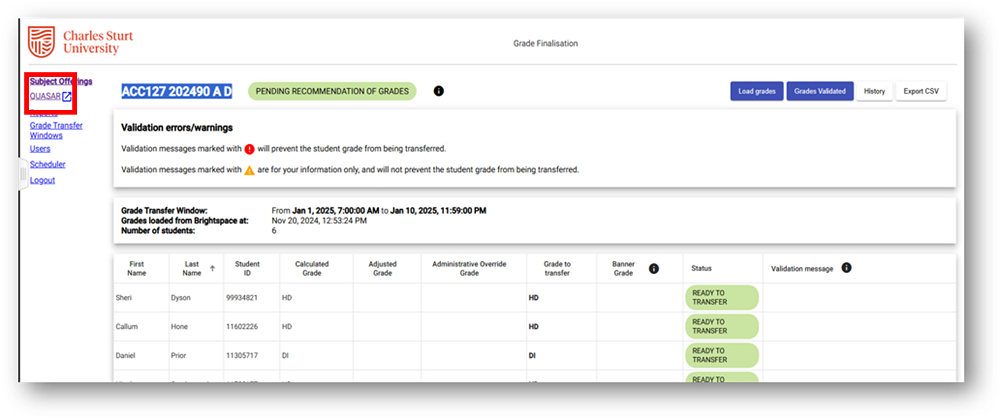
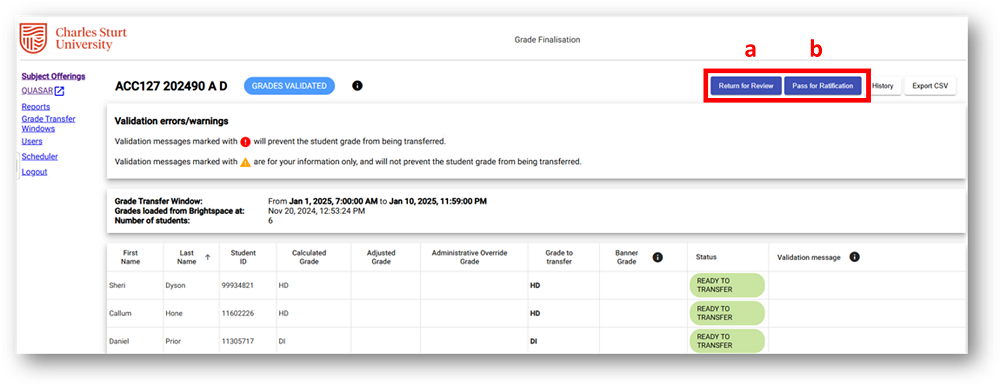
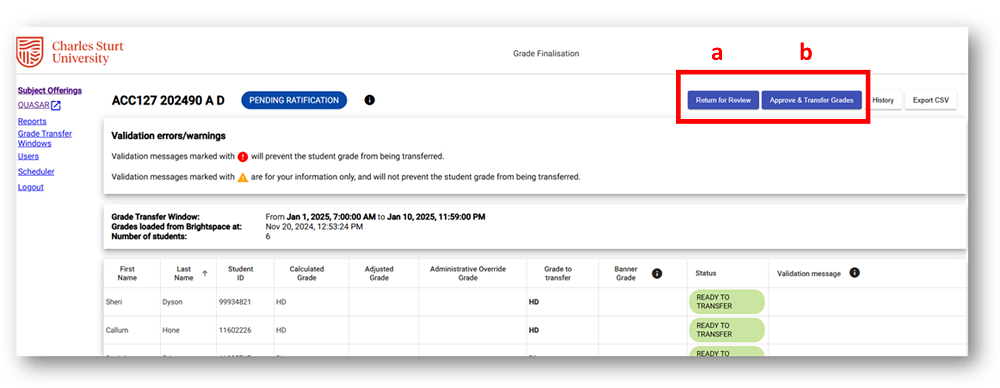
If there is a need to repeat the transfer process in the Grade Finalisation tool, you will need to log a DIT Cherwell request to have the subject reopened within the tool.
The Grade Finalisation Tool exceptions report has been developed to replicate the report that was generated by Banner post grade transfer. To access the report, click Reports in the Grade Finalisation Tool. This report is only available to the Grade Sign-off officer, Head of School, and the Faculty Subjects Team.
Before generating the report, you can filter by:
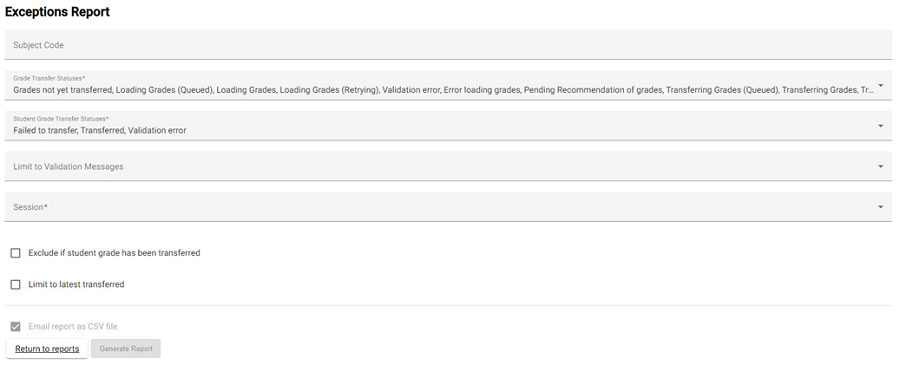
Once you have added your required filters, click Generate Report.
The Generate Report button will only be active once you have added the session as this field is mandatory.
An email report will then be sent to you as a CSV file.
| GRADE TRANSFER STATUS | DESCRIPTION | ACTION |
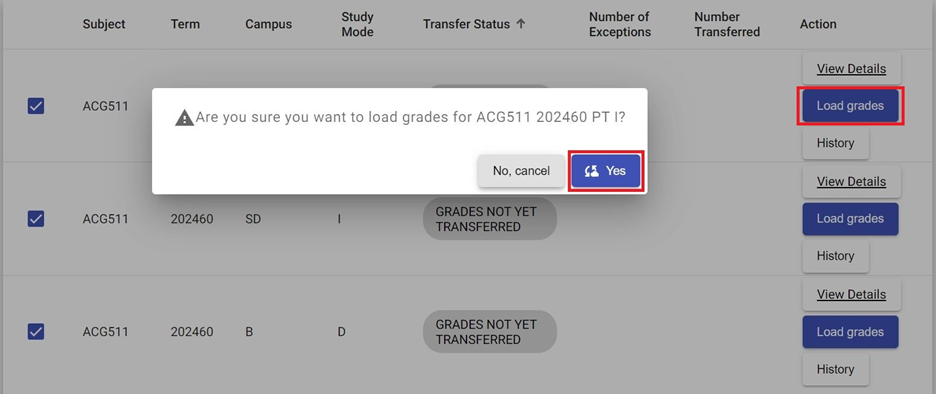
| GRADES NOT YET TRANSFERRED | Grade transfer has not occurred for this subject offering. | Click the Load Grade button |
| LOADING GRADES (QUEUED) | Grades are being loaded (in queue to be processed). | No action required |
| LOADING GRADES | Grades are being loaded. | No action required |
| LOADING GRADES (RETRYING) | Grades are being loaded (retrying after transient error). | No action required |
| VALIDATION ERROR | Grades failed to be loaded due to Subject Site level validation error. | Please recheck and adjust your subject site Gradebook and reload the grades |
| ERROR LOADING GRADES | Grades failed to be loaded due to technical error. | Please report to DIT via a Cherwell Ticket |
| PENDING RECOMMENDATION OF GRADES | Grades are loaded, and ready to be recommended and transferred. | No action required |
| TRANSFERRING GRADES (QUEUED) | Grades are recommended and are being transferred (in queue to be processed). | No action required |
| TRANSFERRING GRADES | Grades are recommended and are being transferred. | No action required |
| TRANSFER VALIDATION ERROR | A validation error has occurred for a student grade with status of 'Ready to Transfer', the entire transfer is halted | Check specific grades first and then re-transfer / re-load ((Grade sign-off officer only) |
| ERROR TRANSFERRING GRADES | There has been a technical fault preventing grade transfer from completing | Please report to DIT via a Cherwell Ticket |
| GRADES TRANSFERRED | All student grades that had a status of "Ready to Transfer" have transferred successfully | No action required |
| GRADES TRANSFERRED WITH ERRORS | An unexpected error has occurred during the transfer of one or more students grades, please check and correct as necessary | Staff will need to check these errors and correct the Banner grade as appropriate via existing workflow outside grade transfer |
| REOPENED | Grade transfer has been reopened. | No action required unless requested by Grade Sign-off officer |
| TRANSFER STATUS | GRADE STATUS | VALIDATION CHECK | ERROR MESSAGE |
| Error loading grades | Validation error | No field named "Administrative Override" found. | Administrative Override Grade column not found. |
| Error loading grades | Validation error | Multiple fields named "Administrative Override" | Multiple Administrative Override Grade columns found, expected one. |
| Error loading grades | Validation error | "Administrative Override" field type is not "Numeric", "PassFail" or "SelectBox". | Administrative Override Grade column type is invalid. Expected "Numeric", "PassFail" or "SelectBox". |
| Error loading grades | Validation error | Global Brightspace Grade Scheme not found for subject grade mode. | Grade Scheme not found for Subject Offering. |
| Error loading grades | Validation error | Global Brightspace Grade Scheme not found for "Administrative Override". | Grade Scheme not found for Administrative Override. |
| Error loading grades | Validation error | No active student enrolments in Subject Offering. | No enrolled students to transfer grades for. |
| Error loading grades | Validation error | Grade Mode not supported (only N or S grade modes are supported). | Grade Mode not allowed for grade transfer. |
| Error loading grades | Validation error | Subject offering is inactive | Subject Offering is inactive. |
| Error loading grades | Validation error | Subject has no active enrolments (where enrolment RSTS_CODE not equal to 'DD') | No enrolled students found. |
| TRANSFER STATUS | GRADE STATUS | ERROR MESSAGE | REASON DESCRIPTION |
| GRADES TRANSFERRED (OR) GRADES TRANSFERRED WITH ERRORS | VALIDATION ERROR | inactiveEnrolmentGradeChange | Student not enrolled in subject |
| GRADES TRANSFERRED (OR) GRADES TRANSFERRED WITH ERRORS | FAILED TO TRANSFER | gradeAlreadyRolled | Enrolment grade has already been rolled to history |
| GRADES TRANSFERRED (OR) GRADES TRANSFERRED WITH ERRORS | VALIDATION ERROR | finalGradeApplied | Cannot override a final grade |
| GRADES TRANSFERRED (OR) GRADES TRANSFERRED WITH ERRORS | VALIDATION ERROR | AWALOverrideGrade | AW/LW cannot overwrite existing grade |
| GRADES TRANSFERRED (OR) GRADES TRANSFERRED WITH ERRORS | VALIDATION ERROR | WDOverrideGrade | Cannot override existing WD grade |
| GRADES TRANSFERRED (OR) GRADES TRANSFERRED WITH ERRORS | VALIDATION ERROR | overrideGradeInvalid | Grade of [grade] cannot be overridden |
| MESSAGE | DESCRIPTION | ACTION |
| Administrative Override Grade column not found. | The Administrative Override column appears to be missing from the subject site. | Please contact your Faculty’s Subject Admin team. |
| Administrative Override Grade column type is invalid. Expected "Numeric", "PassFail" or "SelectBox". | The set up of the Administrative Override column in the subject site is incorrect. | Please contact your Faculty’s Subject Admin team. |
| AW/LW grades not permitted to be transferred. | AW and LW grades are not permitted to be transferred. | Please refer to Special Considerations process. |
| Cannot overwrite existing grade. | Grade transfer can't take place because a grade already exists in Banner. | If you believe this is an error, please contact your Faculty’s Subject Admin team. |
| Cannot overwrite existing grade. | Grade transfer cannot occur at this time as there is a WD (hold) grade for the student's subject at this time. | If you believe this is an error, please contact your Faculty’s Subject Admin team. |
| Cannot overwrite existing substantive grade. | Grade transfer can't take place because a grade (PS, CR, DI, HD, AW, LW or SY) already exists in Banner. | If you believe this is an error, please contact your Faculty’s Subject Admin team. |
| Grade already in Banner. | Grade transfer can't take place because a grade already exists in Banner. | If you believe this is an error, please contact your Faculty’s Subject Admin team. |
| Grade Mode not allowed for grade transfer. | Only N (normal scheme) or S (competency scheme) Grade modes are supported. | Please check in CDAP that the correct Grading Schema has been selected for this subject. If the correct Grading Schema is not N or S, please contact your Faculty’s Subject Admin team. |
| Grade not provided. | Student's grade in Gradebook is blank and no grade can be transferred to Banner. | Please check the grade for the student or the selected Grade Scheme in the Grading Scale field for the Final Calculated Grade/Final Adjusted Grade/Administrative Override columns. |
| Grade Scheme not found for Administrative Override. | The global Brightspace grade scheme is misconfigured. | Please contact DIT service desk. |
| Grade Scheme not found for Subject Offering. | The global Brightspace grade scheme is misconfigured. | Please contact DIT service desk. |
| Invalid adjusted grade. | Grades within the Final Adjusted Grade column are not as expected. | Please check the selected Grade Scheme in the Grading Scale field of the Final Adjusted Grade column. |
| Invalid administrative override grade. | Grades within the Final Adjusted Grade column are not as expected. | Please check the selected Grade Scheme in the Grading Scale field of the Final Adjusted Grade column. |
| Invalid calculated grade. | Grades within the Final Adjusted Grade column are not as expected. | Please check the selected Grade Scheme in the Grading Scale field of the Final Adjusted Grade column. |
| Multiple Administrative Override Grade columns found, expected one. | Duplicate columns exist for Administrative Override in the subject site Gradebook. | Please contact your Faculty’s Subject Admin team. |
| No enrolled students found. | Please contact your Faculty’s Subject Admin team. | |
| Student is not enrolled. | Person in the student role is not enrolled in the subject offering in Banner. | Please check if this person is a genuine student within the subject offering. If you believe this is an error, please contact your Faculty’s Subject Admin team. |
| Subject enrolment grade mode does not match subject offering grade mode. | There is a grade mode mismatch within Banner. | Please contact your Faculty’s Subject Admin team. |
| Subject Offering is inactive. | This subject cannot be graded due to an error on the subject master file. | Please contact DIT service desk. |
| Unexpected fault. | Complete the process again and if the error still occurs, please contact DIT service desk. |