Creating sign-ups for Zoom meetings

Zoom’s integration into Brightspace allows you to create self-enrolled groups for students to sign up to online meetings, so that they can access and view the associated calendar events. This can be helpful for online tutorials, consultations, and one-off events.

The process involves:
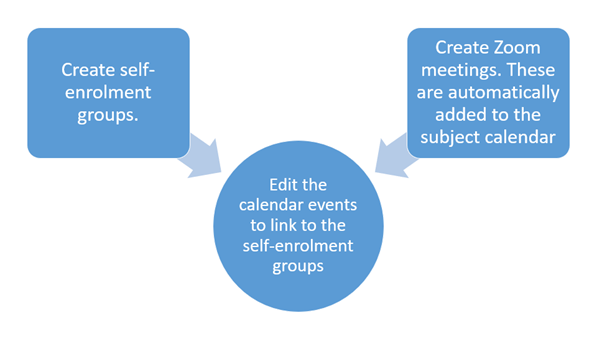
  • Creating a Zoom meeting in Brightspace.
  • Setting up self-enrolment groups.
  • Linking the two together in the Brightspace calendar.

creating sign-ups for Zoom

Creating sign-ups for Zoom meetings in Brightspace

Go to the Groups tool. Either:

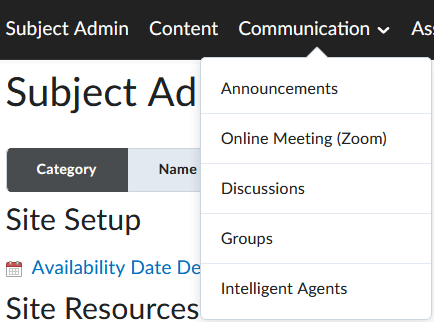
  1. Select Communication, then Groups using the nav bar in the subject site.
    Access Zoom

    Or:
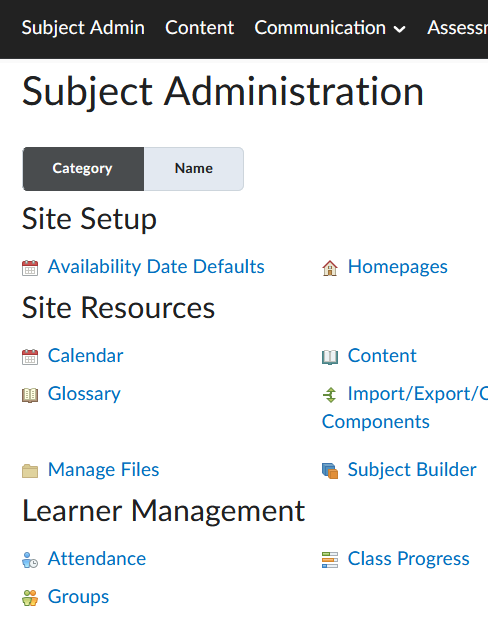
  2. Select Subject Admin in the subject site nav bar and click Groups in the Subject Admin screen.
    Accessing Zoom
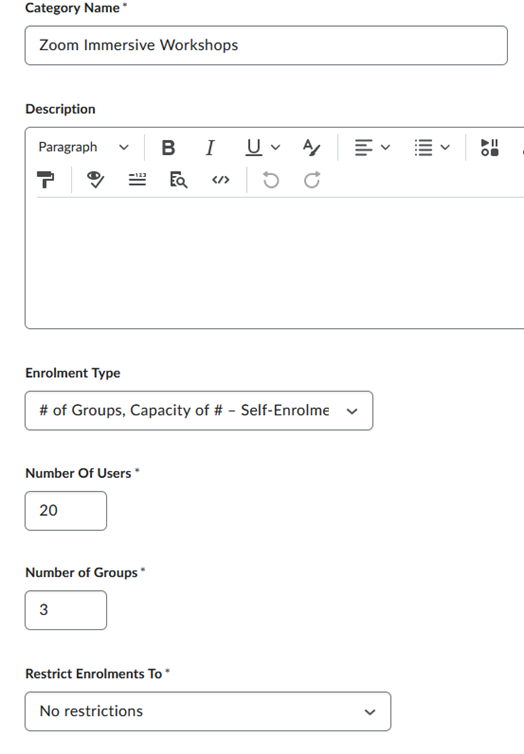
  3. Give your group category a meaningful name. It may be BD Tutorial Groups, for example.
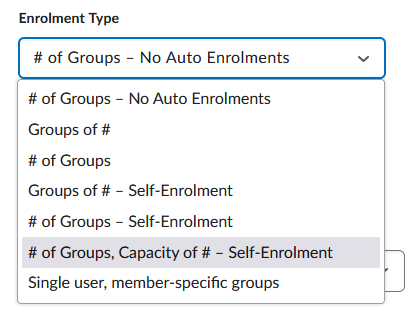
  4. Select # of Groups, Capacity of # - Self-Enrolment. This allows you to set a limit for the number of people in the group, as well as specify a number of groups. 
    Select the group setting you need
  5. Set the number of users allowed to enrol in each group, and the number of groups you require.
    Setting the options
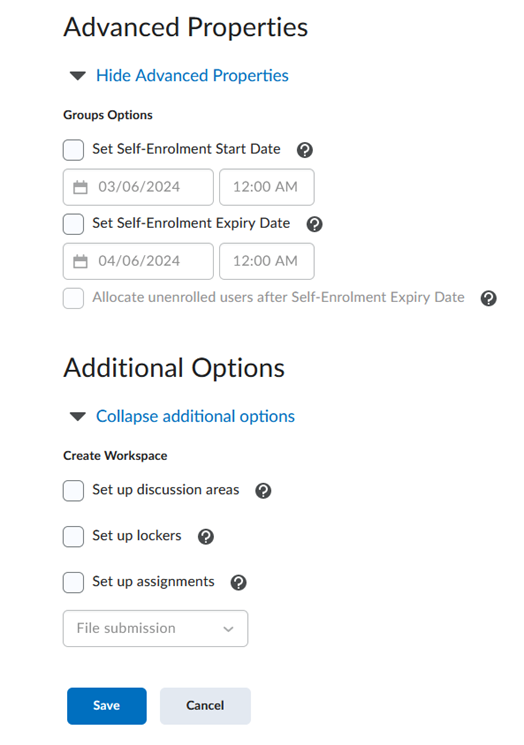
    If you wish, you can set self-enrolment start and end dates under Advanced Properties and choose to allocate unenrolled users to the groups at the end of the sign-up date. Additionally, you can set up discussion areas, lockers, or assignments linked to those groups, if you wish, under Additional Options.

    For more information on discussions, see Mark Discussions.

    For more information on lockers, see the Brightspace Community Glossary of Terms and review Group Lockers.

    For more information on assignments, see the Assignments articles.

    The Assignment and Discussion areas allow for only the students within the Group to see the posts and files. Lockers are online storage spaces where members of a group can share files and provide a way for students to share files with one another. This is particularly useful for group projects. 
    Additional settings for groups
  6. Click Save. Your groups will be created. [FILE: VA7.png] [ALT: Viewing your groups]

In a Brightspace subject site:

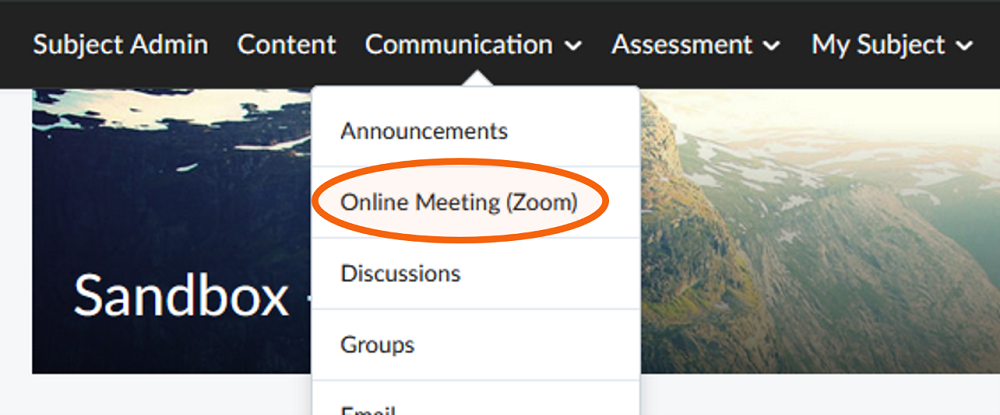
  1. Navigate to the Communication menu of the subject site nav bar and select Online Meeting (Zoom).

    Accessing Zoom

    Zoom meetings are created in Subject sites, rather than Master sites, as these will need session specific dates and information.

  2. Within the Zoom interface in your Brightspace subject site,  click on Schedule a New Meeting.
    Scheduling a new meeting
  3. Specify the meeting topic and date.

    Make the topic name as specific as possible, particularly if it is targeting particular cohorts of students.
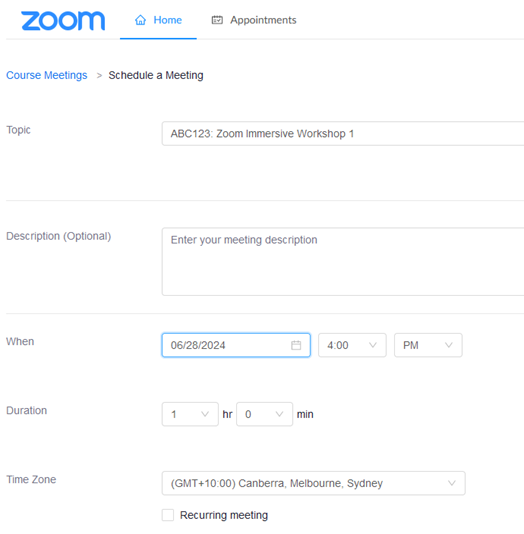
  4. Set the required time and date parameters. In this example, we are creating online meetings for our Bathurst Internal students.
    Setting up a Zoom meeting
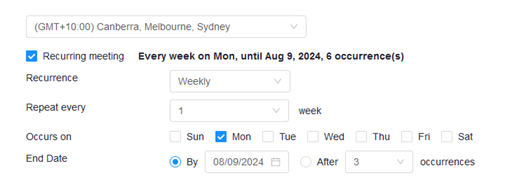
  5. Set the meeting recurrence. If this is a one-off meeting, you can proceed to the next setting. If this is for a recurring meetly, e.g. a weekly tutorial, then set the appropriate times and recurrences. 
    Setting meeting occurrence
    In the next part of the form, you can enable waiting rooms, mute participants upon entry, and automatic meeting recording if needed. We generally don’t use registration or passcodes, but the default security setting is to have the waiting room enabled. This means if someone who attempts to join is not an authenticated Charles Sturt user, they will be held up in the waiting room until the host admits them to the meeting. It is recommended to have participant video off on entry, and to mute participants on entry, to minimise disruptions when students enter. Students can toggle these on or off in the meeting as needed.

    Note: If you enable ‘join before host,’ you should not record the meeting automatically, as recording will start as soon as someone enters the room and students may not be aware they are being recorded.
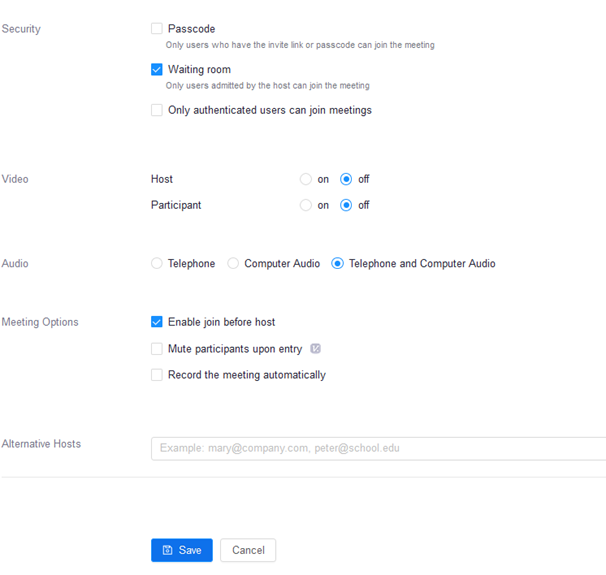
    Set options in Zoom

    This is also where you enable cloud recording of your meeting during set-up. If you select Record the meeting automatically, you will be able to specify where that recording will live. We recommend selecting In the cloud to make recordings accessible to all.
  6. Select Home to return to the main Zoom screen to see a list of all the meetings you have scheduled.

    Viewing the list of meetings
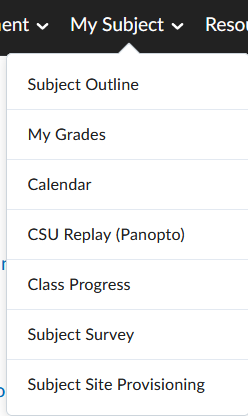
  1. Access the subject calendar by clicking My Subject, then Calendar.
    Access the Calendar
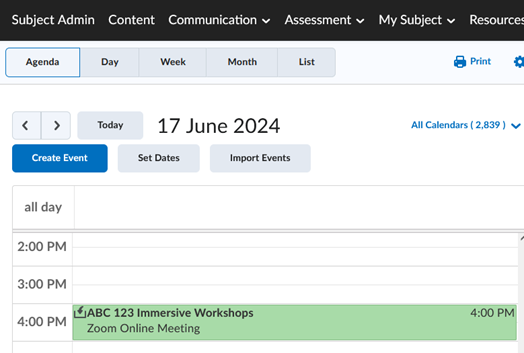
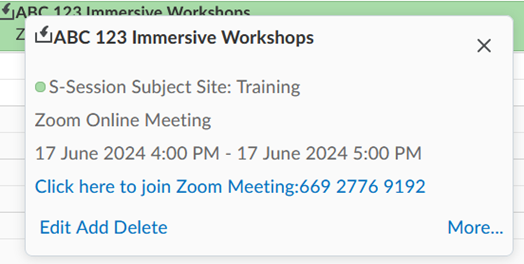
  2. Find the Calendar event related to your Zoom meeting.
    A calendar event in your Brightspace calendar
  3. Click the event. Select Edit.
    Select Edit
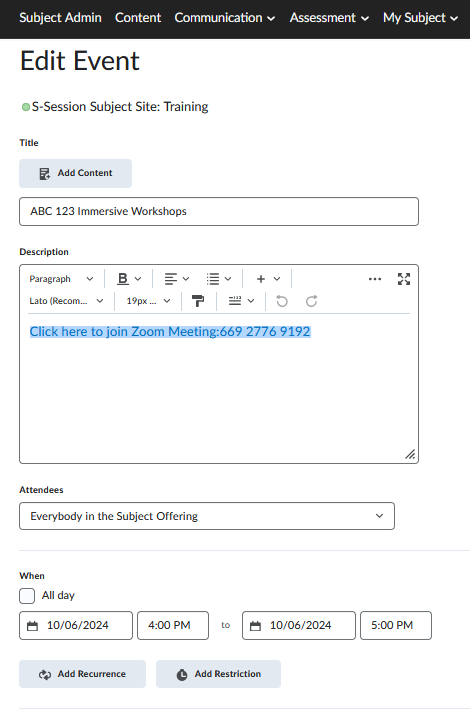
    You can now edit the event to add more information, in addition to the already provided link that is there. 
    Editing the calendar event
  4. At this point, you need to restrict the attendees to a particular group, under Attendees. Click the drop-down box and select the group that you wish to restrict it to.
    Attendee drop-down box

    Select the group you want to restrict this event to
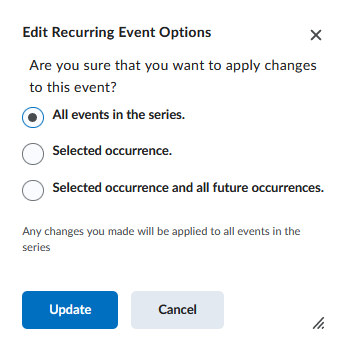
  5. Click Save. If this is part of a series of events, i.e. you have set this up as a recurring meeting in Zoom, you will now see the following confirmation box. 
    Confirmation and option box for recurring events
    Choose your option and select Update. Edit your other meetings in the same way, linking them to the other groups you have created.

Now that you have created these sign-ups, you need to let your students know that they need to sign-up. You can do this via Announcements or discussion forum posts.

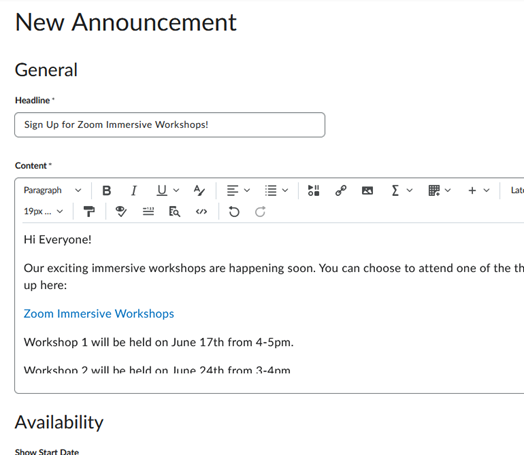
Sending announcements

  1. Access the Announcements tool from the subject navigation bar Communication, then Announcements.
  2. Click New announcement.
    New Announcement
  3. Write your announcement. Include a meaningful title and all the necessary details.
    Write your announcement
  4. To include a link to the groups for sign-up, select the Insert Quicklink option on the editing toolbar:
    Insert Quicklink
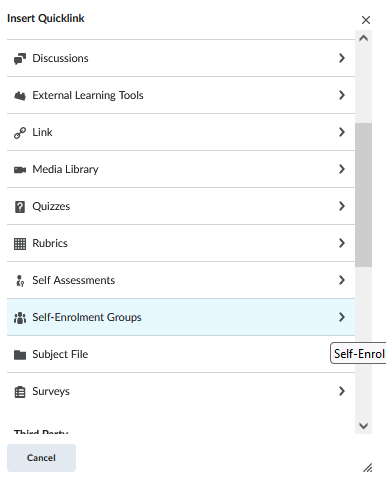
  5. From the Quicklink menu, select Self-Enrolment Groups.
    Select Self-Enrolment Groups
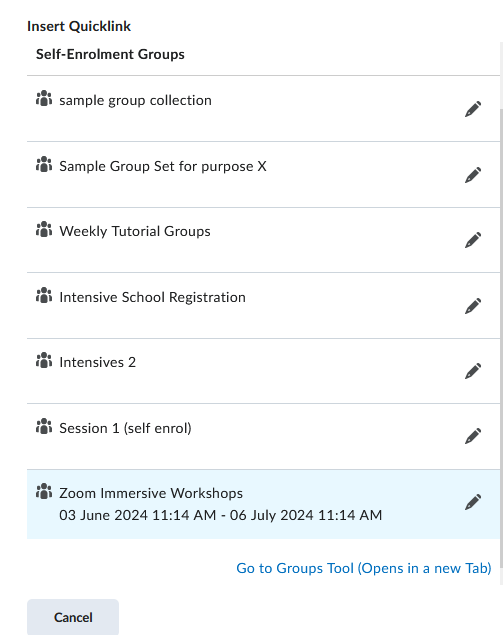
  6. Select the Group category that you wish to link to, and the link to that will be added to your announcement.
    Select the Group category you want to link to

Creating a Discussion post

  1. Access the Discussions tool from the subject navigation bar Communication, then Discussions.
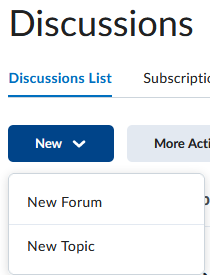
  2. Click New, then New Topic.
    New Discussion
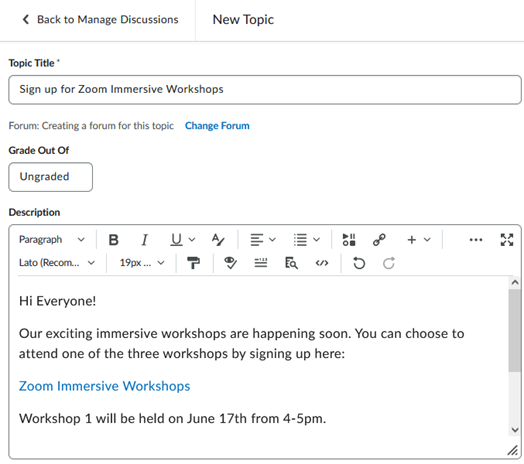
  3. Write a post in the discussion topic. Include a meaningful title and all the necessary details.
    Write your discussion
  4. You can include a link to the groups for sign-up by selecting the Insert Quicklink option on the editing toolbar:
    Insert Quicklink
  5. From the Quicklink menu, select Self-Enrolment Groups.
    Select Self-Enrolment Groups
  6. Select the Group category that you wish to link to, and the link to that will be added to your post.
    Select the Group category you want to link to

This page may be updated at any time. If you print it, you could miss future changes. Please check this page regularly for the latest updates.