Zoom is a cloud-based video conferencing tool which can be used by staff and students at Charles Sturt to interact online. This article outlines the process of scheduling and managing online meetings using Zoom within a Brightspace subject site. It explains the steps staff should take to schedule new meetings, manage upcoming meetings, and access recordings.
In this article, you will find information about creating Zoom meetings for use within your Brightspace subject, as well as information regarding the use of IVT (Interactive Video Teaching) spaces, which also utilise Zoom for lecture capture (managed centrally by DIT).
In your subject session site
Click on the Communication expanding menu in the subject navigation bar and click on Online Meeting (Zoom).
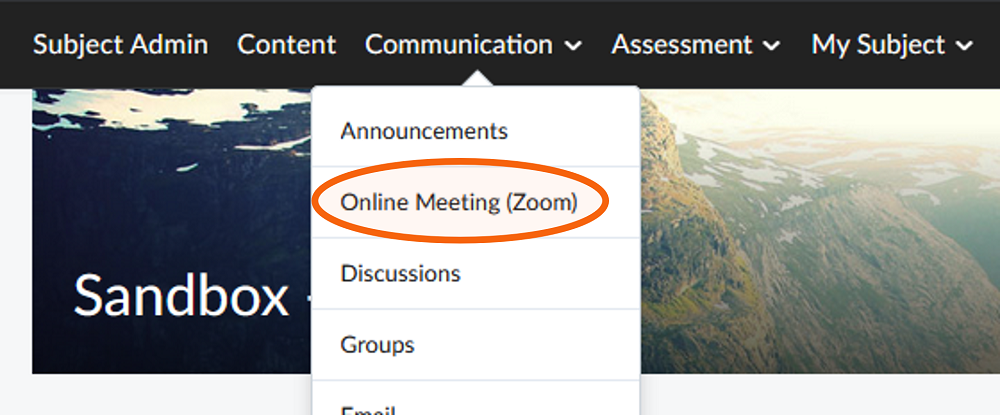
Zoom meetings are created in Subject sites (session-based), rather than Master sites, as these meetings will need session specific dates and information.
You will now see the Zoom interface in Brightspace. On first run this may take a few seconds to appear as the tool is being set up for first use.
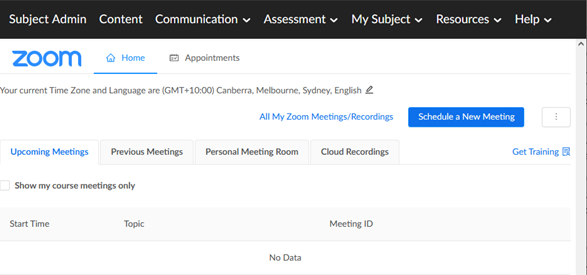
The Brightspace Zoom interface organises meeting information in a straightforward manner, in a single screen with panels and tabs. The tool allows staff to schedule (create) and access their subject level Zoom meetings, and students to access these meetings and then retrieve recordings (video / audio) after each event.
The following tabs will appear:
Upcoming meetings: Meetings that have already been scheduled. Brightspace will show you the dates, topics, and meeting ID and will allow you to start or join the meeting.
Any staff member in the subject site will be able to launch and use the tool. The host, the person who created the meeting in the first instance, is the only one who will be able to delete those meetings.
Previous meetings: Details of meetings that have already been run will appear under this tab.
Cloud recordings: Recordings made of meetings created inside this tool and saved to the cloud will appear in this section.
Within the Zoom tool in your Brightspace subject:
Click on Schedule a New Meeting.

Specify meeting topic and date for the meeting. Make the topic name as specific as possible, particularly if it is targeting cohorts of students. Set the required time and date parameters. In this example we are creating online meetings for Bathurst Internal students.
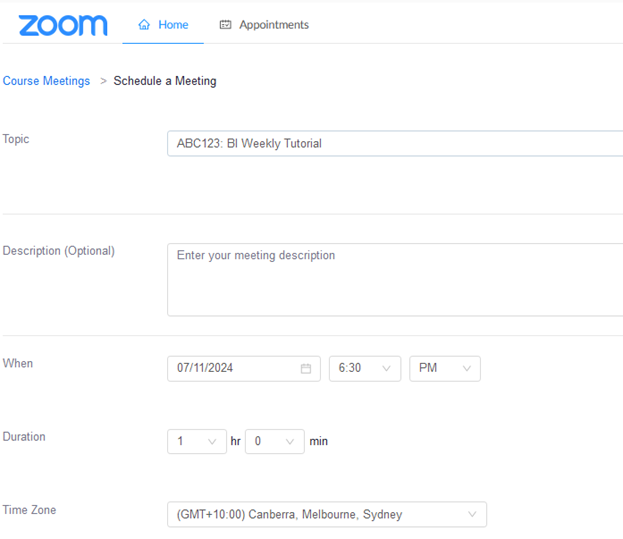
Set the meeting recurrence. If this is a one-off meeting you can proceed to the next setting.
In this example, we are setting up weekly meetings that will recur for the 14 weeks of session. This will save creating individual meetings for each week.
Underneath the Time Zone field select the Recurring meeting check box, choose the recurrence settings – daily or weekly – and how often it repeats. You can specify an end date or select the number of occurrences for those meetings. 
In the next part of the form you can enable the waiting room, mute participants upon entry, and automatic meeting recording if needed. We generally don’t use registration or passcodes, but the default security setting is to enable the waiting room. This means if people attempting to join are not authenticated users, they will enter in the waiting room. It is recommended to have participant video off on entry, and to mute participants on entry, to minimise disruptions when students enter. Students can toggle these on or off in the meeting as needed.
If you enable join before host, you should not record the meeting automatically as students may not be aware they are being recorded. Additionally, recording will start every time anyone enters the room and these recordings will appear in the recordings list.
The alternate hosts field does not have to be filled in with the details of other teaching staff – they will have hosting rights from their role in the subject site. They should access the meeting from within the Brightspace Zoom LTI to obtain the correct authentication. 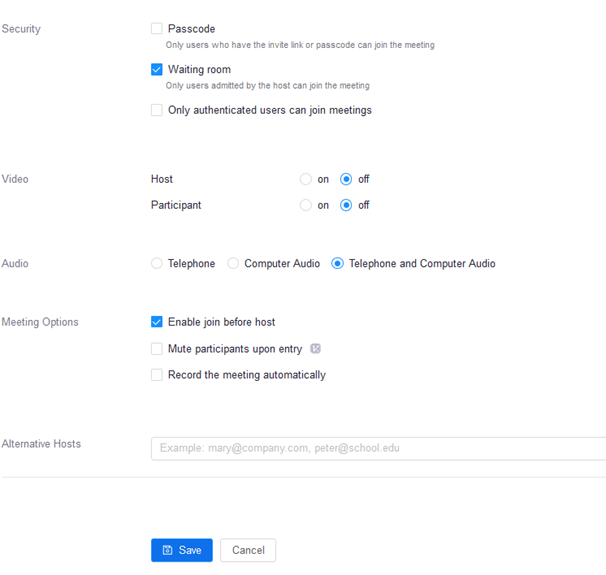
This is also where you enable cloud recording of your meeting during set-up. If you select Record the meeting automatically you will be able to specify where that recording will live. You should select In the cloud to make recordings accessible to all. You can alter the viewing permissions for cloud recordings to control when students are able to view them. This will be covered later in Manage cloud recordings.

Once you have completed all the settings, select Save.
A confirmation screen will appear. It provides a summary of the meeting. At this point, you also get access to your ICS links and your iCal links, so the creator of the meeting can add it to Outlook.
Select Home to return to the main Zoom screen to see a list of all the meetings you have scheduled.
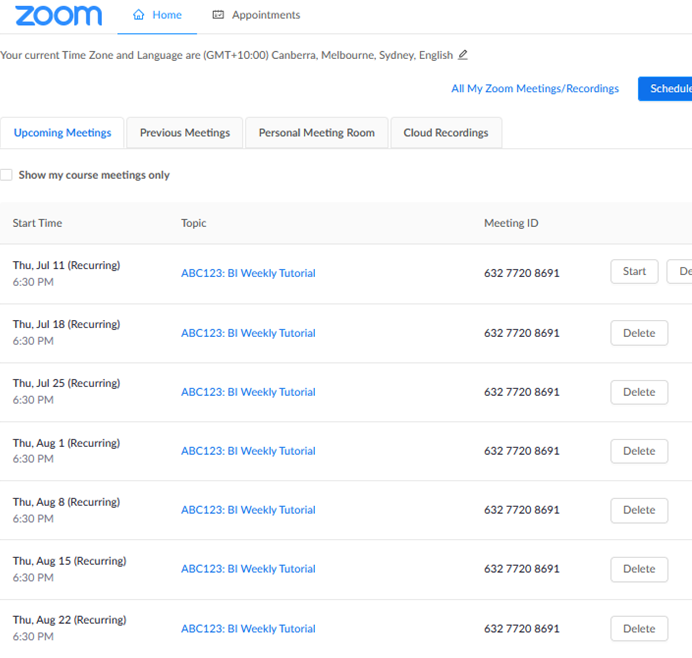
If you have lots of meetings, you can easily see which meeting are linked (reoccurring) as they will all have the same Meeting ID.
Before you start this process, go to the meeting that you want to import and copy the Meeting ID.
In this section we discuss how you can delete or edit upcoming meetings.
In the Upcoming Meetings tab, select the Delete option next to the meeting time you wish to delete. In the example below we are deleting a meeting as students will be on mid-session break for that week.
A confirmation screen appears. Select Delete just this occurrence. 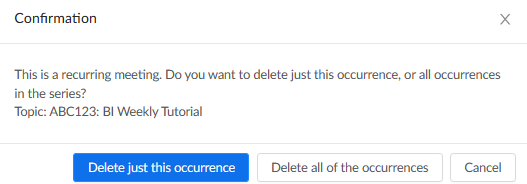
In the Upcoming Meetings tab, click the hyperlinked name of the meeting you wish to edit.
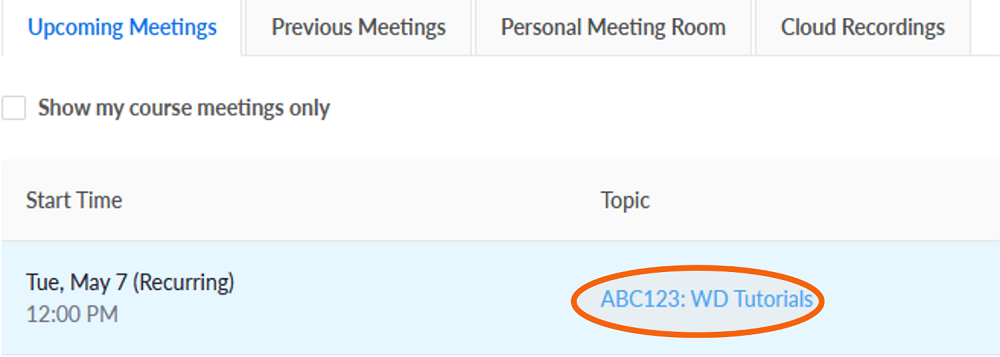
You will see a page displaying the meeting details. To change any of these details, scroll to the bottom of the page and click on Edit this Meeting.

Make the changes you need, and then select Save.
Cloud recordings in the Brightspace Zoom LTI are set by default to publish all recordings, which makes them automatically available to students.
If you do not wish to make recordings published by default you can change this setting. For example, if you have used Zoom to set up interactive oral assessments, you may not wish the videos to be accessed by other students.
To change the publish settings, click on the Cloud Recordings tab.
Toggle the Publish All Recordings button off.
![Toggle Publish All Recordings on or off]](https://cdn.csu.edu.au/__data/assets/image/0008/4320989/zoom11.png)
After your meetings have occurred, you can then choose which recordings to publish by choosing to Publish All Recordings, or by selecting the Publish toggle icon next to the recording that you want to publish.

To delete unwanted cloud recordings, select the Delete option next the recording you wish to delete, select multiple recordings using the checkboxes and use the Delete Selected (X) option, or Delete All.
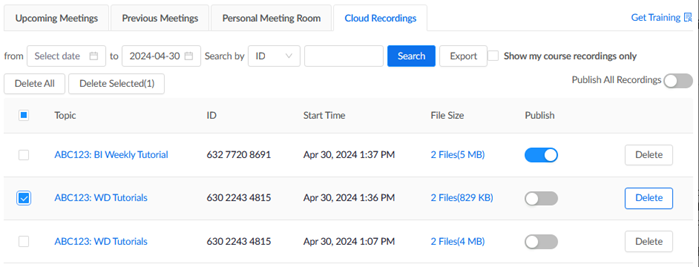
A confirmation screen will appear. To proceed with deletion, select Yes.
CSU's Interactive Video Teaching (IVT) spaces (e.g. lecture theatres) offer a combination of in-person and remote learning possibilities.
Zoom is the platform used in CSU’s IVT spaces. To ensure proper scheduling and recording of teaching in these spaces, Zoom recordings need to be scheduled centrally by DIT, rather than the academic attempting to do so within the subject site.
Timetabled classes: Zoom bookings will be made based on the official published session timetable. Once scheduled, academics will receive the Zoom session details, with the expectation being that (after the lecture) they will then share any recording links with students (see below).
Casual room bookings: After the room booking has been made, any co-hosts identified (incl. the lecturer) will receive a confirmation email with room details. Any queries regarding the booking need to be raised with the DIT Service Desk.
For more information go to: Teaching Space Help - Division of Information Technology (csu.edu.au)
Whether it is an ongoing session booking or a casual booking, you should share this link within your Brightspace subject (e.g., via announcements, discussions etc), to ensure that your students have easy access to the recordings.
Please note that non-IVT room bookings are recorded using Panopto and should be shared with students embedded in content rather than using the link to ensure they work. For more information refer to: Embedding Panopto videos
This page may be updated at any time. If you print it, you could miss future changes. Please check this page regularly for the latest updates.