Copy content

Moving from Interact2 to Brightspace gives us a new approach to subject management through master sites and subject sites.

Master sites provide a validated and up-to-date version of learning materials and assessment, which will be used each teaching session, ensuring consistency and version control.

Subject sites can be thought of as a photocopy of the master site that is used in the designated teaching session. In the subject site, you can customise content and assessment for that offering if needed.

It is useful to have a good understanding of the purpose of master and subject sites before attempting to import, export or copy content. If you need to recap this, please see the article titled Master and Subject sites.

This article will cover the following key scenarios that may require you to copy content.

There will be times when you would like to copy sections of content within the same Brightspace site, either within the same master site or the same subject site. This is a straightforward process you can do yourself.
  1. Click on the Content menu in the subject navigation bar.
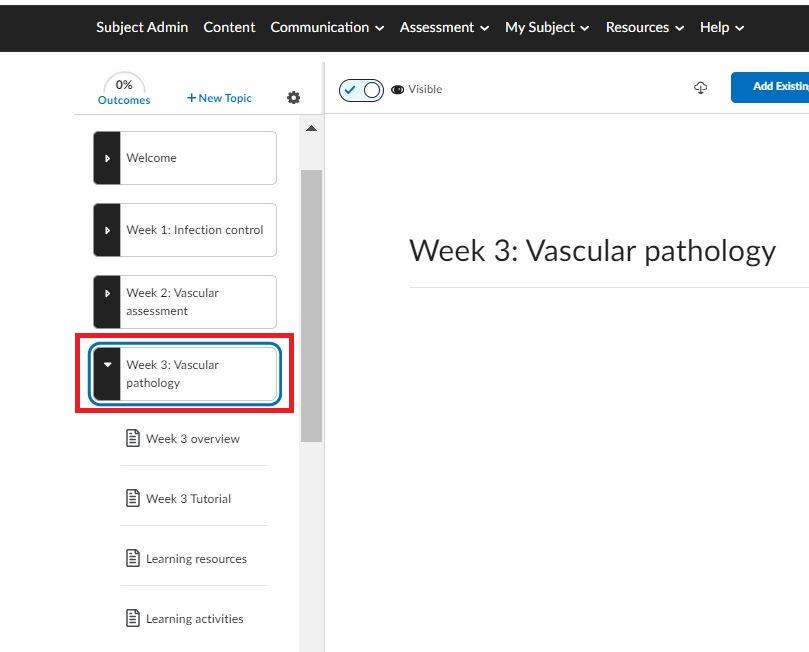
  2. Click on the topic where you want the copied content to sit.
    Screenshot of the Content tool in Brightspace. A topic is highlighted, followed by four HTML pages arranged beneath it. This image illustrates the difference in hierarchical structure between topics and html pages
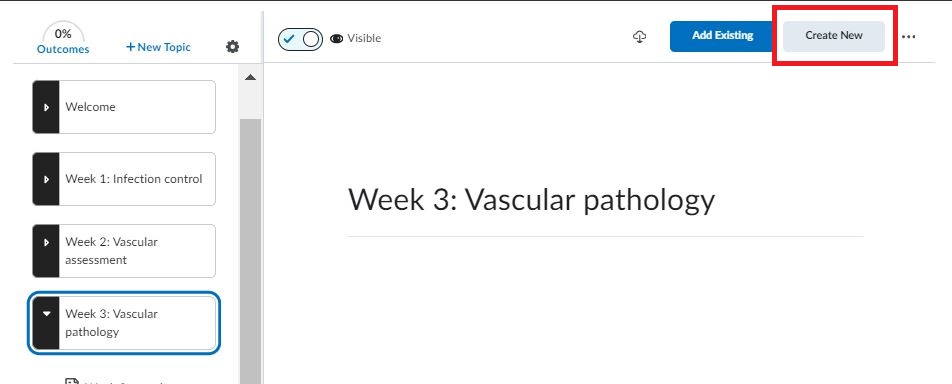
  3. Click Create New.
    Screenshot of the Content tool in Brightspace. A topic has been clicked and the Create New button is now visible
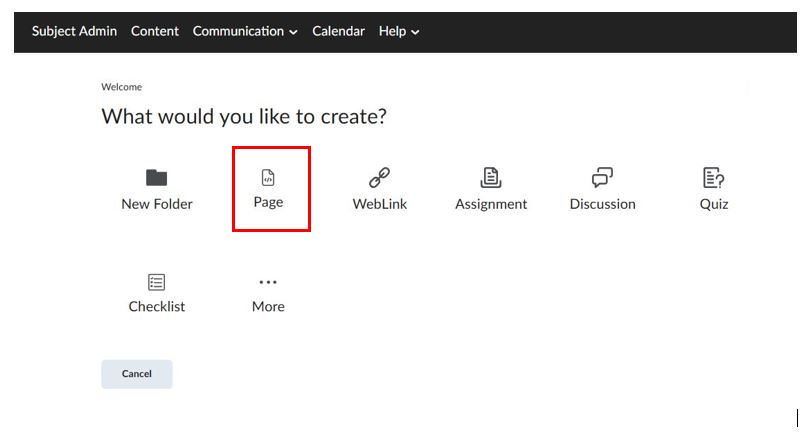
  4. Click Page.

    The Page option has been highlighted, demonstrating that this is what is selected to create a new page
  5. Enter a title for the page.
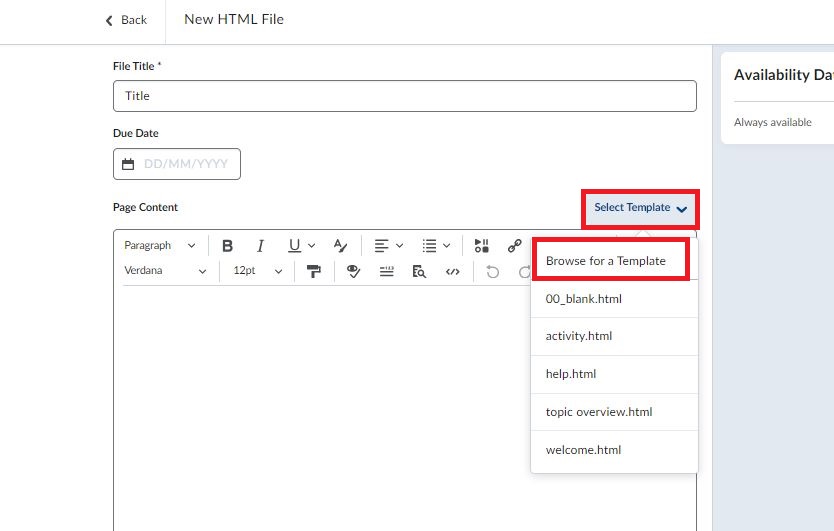
  6. Click Select Template and then click Browse for a Template.
    A screenshot of the HTML editor. The Select Template option has been clicked, and then the Browse for a Template button is highlighted, demonstrating that this is what is selected to search for a HTML template from within the same site
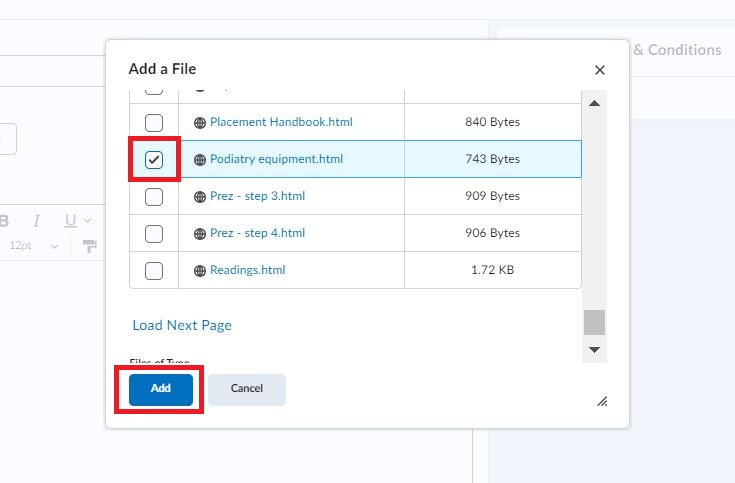
  7. Scroll to select the content you want to copy and click the checkbox.
  8. Click Add.
    A screenshot of the Add a File pop up. The checkbox next to a HTML page has been selected and the add button is highlighted, demonstrating how to add a HTML template to your new page
  9. You will now see the content has been copied to your new Page.
  10. If required, you can make changes to the Page. The copied page behaves independently, and any changes you make will not affect the source page.
  11. Click Save and Close.

If you want to confirm you are selecting the correct template/page, you can preview the page prior to adding it to content. To do this, click on the hyperlinked file name when you see the list of files to select from in the 'Add a File' screen. The html file will download and you can open and preview it prior to adding to the content.

You may have small amounts of content that you want to copy from Interact2 to Brightspace. Brightspace has a very user-friendly interface, and the best option is to manually add any content you want included from Interact2. However, it is important that you follow a few key steps for content to copy correctly.

HTML Templates: You should add a template to the Brightspace pages. HTML templates not only improve the visual quality of your content and promote accessibility, but they also help minimise errors when copy/pasting content.

To add a template to your Brightspace page:

  1. Click Select Template and choose which HTML template you want to apply.

    Screenshot the HTML editor in Brightspace The select template button is shown

  2. Add other content to the template.
  3. Click Save

Multimedia files (images, audio, video files): Multimedia files will need to be downloaded to your device and uploaded to the Brightspace site using Insert Stuff.
  1. Download the file from Interact2 and save it to your device.
  2. In the Brightspace subject, click on the Content expanding menu in the subject navigation bar.
  3. Click on the page you want to edit and click on the More Options icon. Click Edit.

    Screenshot the Content Tool in Brightspace The More Options button has been clicked, and Edit is selected

  4. Click Insert Stuff

    Screenshot the HTML editor in Brightspace The Insert Stuff button is selected

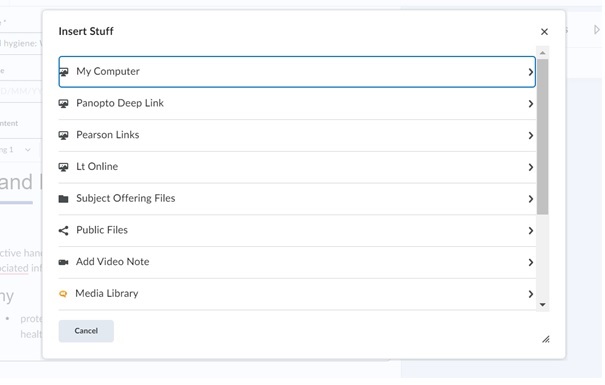
  5. Click My Computer.

    Screenshot the Insert Stuff pop-up in Brightspace

  6. Click Upload.
  7. Select the file you want to upload from your device and click open.
  8. Click Upload.
  9. Click Save and Close.

Text: When copy/pasting from Interact 2 use ‘plain text’. To do this, when pasting, right click using your mouse and click on Paste as plain text.

Screenshot the HTML editor in Brightspace. After right-clicking, the paste as plain text option is visible

When pasting, you might see a pop-up that asks you if you want to remove or keep formatting. You should select to remove formatting.

Screenshot the HTML editor in Brightspace. After pasting, the remove formatting option is visible

Links: It is important to ensure that no links to Interact2 are copied into Brightspace sites. Interact2 will be decomissioned at the end of 2024.

If you or your students are seeing a pop-up to sign-in to Interact2, it is because unwanted code has been manually copied from Interact2. If you need assistance finding source code you may have accidentally copied from the old LMS or advice on copying content, please Log a Service Request for help.

You may not notice the pop-up if you have access to the Interact 2 site the content is copied from. But for any user that doesn’t have access, it will ask them to sign in.

For more information on using the Content tool, see Organise subject content.

All Learning Management Systems (LMS) have their own procedures and nuances when importing, exporting and copying content and Brightspace is no different. It is important that you precisely follow each step to limit the chance of errors and loss of data. It is always a good idea to double-check your actions and ensure that you understand the implications of each step before proceeding.

The approach you take to copy content from one Brightspace site to another will depend on the volume of content you need to copy.

I want to copy small amounts of content (such as a few pages)

In the source site:

  1. Click on the Content expanding menu in the subject navigation bar.
  2. Click on the topic that has content you want to copy.

    Screenshot of the Content tool in Brightspace. A topic is highlighted, followed by four HTML pages arranged beneath it. This image illustrates the difference in hierarchical structure between topics and html pages

  3. Click on the page you want to copy.
  4. Click the options button and click Edit.

    Screenshot of the Content tool in Brightspace. A HTML page has been clicked, then the options button has been clicked, revealing the edit option

  5. To copy all the page, click anywhere in the Page Content and click ctrl A and ctrl C to select all the content and copy.
  6. To copy parts of the page, select the text, interactive or video you want to copy and click ctrl C.
  7. Click Cancel.
  8. Your source content has been unaffected.

In the destination site:

  1. Click on the Content menu in the subject navigation bar.
  2. Click on the topic where you want the copied content to sit.

    Screenshot of the Content tool in Brightspace. A topic is highlighted, followed by four HTML pages arranged beneath it. This image illustrates the difference in hierarchical structure between topics and html pages

  3. Click Create New.

    Screenshot of the Content tool in Brightspace. A topic has been clicked and the Create New button is now visible

  4. Click Page.

    The Page option has been highlighted, demonstrating that this is what is selected to create a new page
  5. Click Select Template and choose a HTML template to apply.
  6. Enter a title for the page.
  7. Click anywhere in the Page Content section, click ctrl V to past the content from the source page.
  8. Click Save and Close.

I want to copy large amounts of content (most or all the site)

Support is readily available to assist with this process for the 202460 session. You can Log a Service Request for help, making sure you select the Brightspace (LMS) option.

To streamline this process, please see the notes below:

  1. The person that logs the Cherwell should be the Subject Convenor of the Master site, if the request is to copy into the Master site.
  2. The person that logs the Cherwell should be the Subject Convenor or Subject Coordinator if the request is to copy into a session site (they need to be the SC of the session site that it is being copied into).
  3. The information we need to know in the Cherwell ticket:
    1. The site name that is to be copied and the destination site name
    2. What content needs to be copied (is it all or just some modules)
    3. Do Assessments, Quizzes and Rubrics need to be copied?
    4. Do Discussions need to be copied (Threads and posts cannot be copied)
    5. Do Announcements need to be copied (Not advisable to copy between sites as the dates will also be copied and cannot be deleted).
    6. Is there anything in the destination site that needs to be kept (if so, what do you want to keep)
  4. Note: Grades and calendar tools will not be copied.

This page may be updated at any time. If you print it, you could miss future changes. Please check this page regularly for the latest updates.